

1. Introduction — or: How We Stopped Worrying and Let GitHub Actions Do the Work
You commit code. GitHub runs tests. Everything passes.
You push to your release branch.
Boom — a new version is tagged, zipped, and published as a Release.
Sounds simple, right?
Well… yes. But also no. This post walks you through every step from zero to the final release ZIP file sitting proudly in GitHub.
We’ll build:
- A test pipeline
- A compatibility test matrix
- A security scan
- A conditional release workflow
- Automatic tagging
- Changelog generation
- Release ZIP packaging
- Publishing the Release + assets to GitHub
And we’ll do it gently, like explaining Git to a cat.
2. The Big Picture — How Our Workflow Works
Before writing any YAML (don’t worry, we’ll get there), let’s understand the flow:
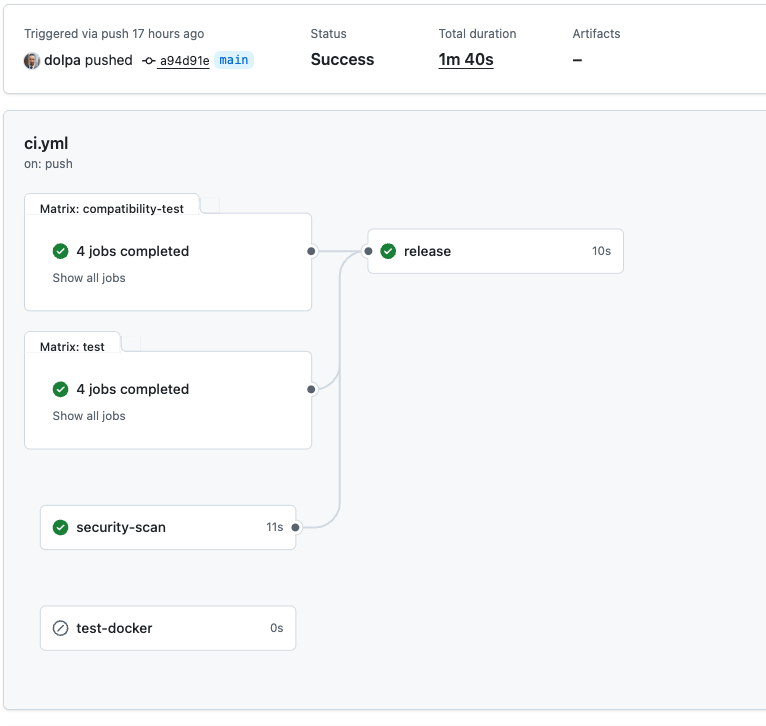
The pipeline structure
- Every push & PR
Runs:- Unit tests
- Compatibility tests
- Security scans
- Only on specific branches (
main,release/,)
And only when all previous jobs succeeded, the Release workflow. - The Release workflow:
- Determine version number
- Tag the commit
- Generate changelog
- Build ZIP package
- Create GitHub Release
- Upload ZIP asset
Like a factory assembly line… but for code.
3. Preparing Your Repository
Before writing CI scripts, make sure your repo is ready.
3.1. Folder Structure
Suggested structure:
.
├── modules/
├── bash-utils.sh
├── README.md
├── LICENSE
├── .github/
│   └── workflows/
│       ├── test.yml
│       └── release.yml
└── .gitignore
In my little project, I put everything into ci.yml.
3.2. Create the .github/workflows directory
Place all workflow YAML files inside:
mkdir -p .github/workflows
4. Writing the Test Workflow (CI Stage 1)
This workflow runs for all pushes and pull requests.
It ensures your code isn’t quietly plotting world domination.
Example file:
ci.yml
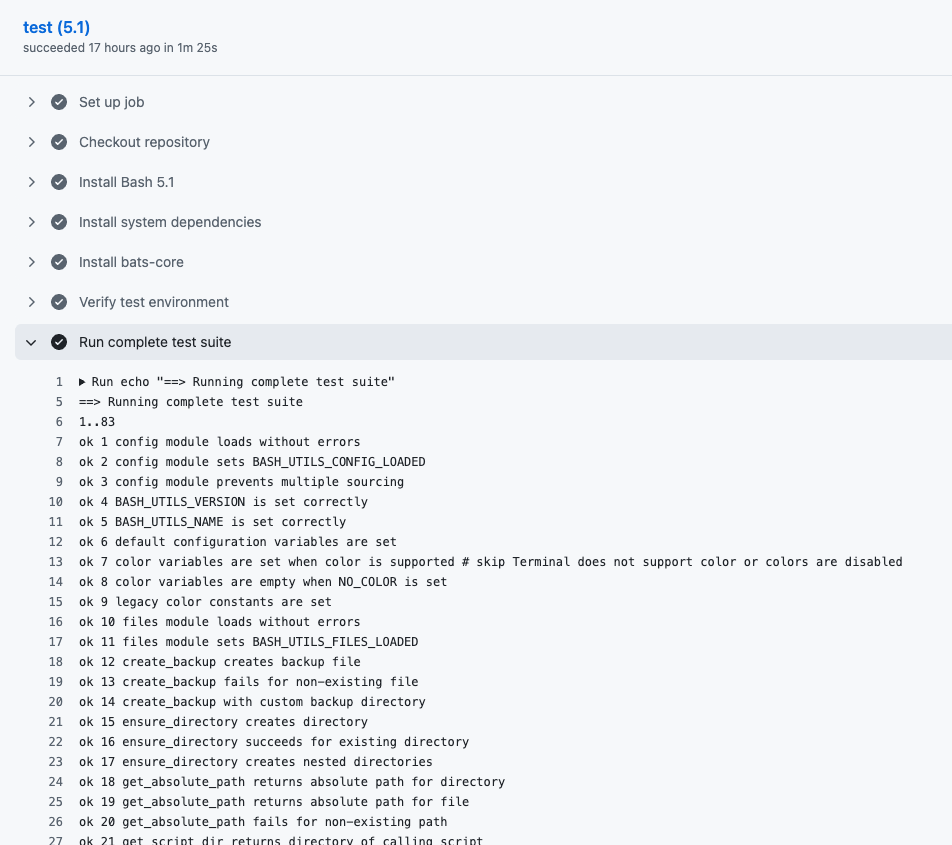
    - name: Run complete test suite
      run: |
        echo "==> Running complete test suite"
        bats tests/*.bats
5. Compatibility Testing (CI Stage 2)
This is your matrix (Bash versions, Python versions, OS variations — whatever you need).
Example matrix:
runs-on: ubuntu-latest
    strategy:
      matrix:
        bash-version: ['4.4', '5.0', '5.1', 'latest']
6. Security Scan (CI Stage 3)
Even Bash scripts deserve a security scan, if not a warm hug.
Examples:
- ShellCheck
- Dependency scanners
7. The Release Workflow — The Star of the Show
Now we get to the juicy part.
This workflow only runs IF:
- All tests passed
- AND you're on:
main- any
release/*branch
Here is the full workflow (final version from our conversation), broken down step-by-step so your readers understand every moving part.
8. Step-by-Step Breakdown of the Release Workflow
8.1. Step 1 — Checkout Full Repository
We fetch all history, including tags.
- name: Checkout repository
  uses: actions/checkout@v4
  with:
    fetch-depth: 0
In the logs of your workflow, you should see something like:
Run actions/checkout@v4
Syncing repository: dolpa/dolpa-bash-utils
Getting Git version info
Copying '/Users/runner/.gitconfig' to '/Users/runner/work/_temp/a437752d-e297-49b2-8122-dee56066a155/.gitconfig'
Temporarily overriding HOME='/Users/runner/work/_temp/a437752d-e297-49b2-8122-dee56066a155' before making global git config changes
Adding repository directory to the temporary git global config as a safe directory
/opt/homebrew/bin/git config --global --add safe.directory /Users/runner/work/dolpa-bash-utils/dolpa-bash-utils
Deleting the contents of '/Users/runner/work/dolpa-bash-utils/dolpa-bash-utils'
Initializing the repository
Disabling automatic garbage collection
Setting up auth
Fetching the repository
Determining the checkout info
/opt/homebrew/bin/git sparse-checkout disable
/opt/homebrew/bin/git config --local --unset-all extensions.worktreeConfig
Checking out the ref
/opt/homebrew/bin/git log -1 --format=%H
a94d91e43d64521da41d2bd9b09cbacdd6c9704f
8.2. Step 2 — Determining the Version Number Automatically
We use date-based versioning.
- On
main:vYYYY.MM.DD - On
release:vYYYY.MM.DD - For other branches, you can use:
vYYYY.MM.DD.HHMM
      - name: Get library version
        id: version
        run: |
          # new versioning scheme: date-based
          if [[ "${{github.ref }}" == "refs/heads/main" ]]; then
            VERSION="v$(date +'%Y.%m.%d')"
          else
            VERSION="v$(date +'%Y.%m.%d.%H%M')"
          fi

          echo "Determined version: $VERSION"
          echo "VERSION=$VERSION" >> $GITHUB_ENV
          echo "version=$VERSION" >> $GITHUB_OUTPUT
        shell: bash
8.3. Step 3 — Configure Git Identity
GitHub runners do not have a committer identity.
git config user.name "github-actions"
git config user.email "github-actions@github.com"
8.4. Step 4 — Create the Tag (Safely)
This part ensures the workflow does not die if the tag already exists.
if git rev-parse "${VERSION}" >/dev/null 2>&1; then
  echo "Tag exists, skipping"
else
  git tag -a "${VERSION}" -m "Release ${VERSION}"
  git push origin "${VERSION}"
fi
8.5. Step 5 — Build the Changelog
We compare last tag → current commit.
git log --pretty=format:"- %s (%h)" PREV_TAG..HEAD
8.6. Step 6 — Create the ZIP File (Release Asset)
zip -r dist/bash-utils-${VERSION}.zip \
  README.md \
  RELEASE_NOTES.md \
  LICENSE \
  modules \
  bash-utils.sh
8.7. Step 7 — Create GitHub Release + Upload Asset
No second step needed — both upload and release creation happen here.
      - name: Create GitHub Release & Upload Assets
        uses: softprops/action-gh-release@v2
        with:
          tag_name: ${{ steps.version.outputs.version }}
          name: "bash-utils ${{ steps.version.outputs.version }}"
          body_path: RELEASE_NOTES.md
          draft: false
          prerelease: false
          files: dist/*.zip
          overwrite_files: true
        env:
          GITHUB_TOKEN: ${{ secrets.GITHUB_TOKEN }}
9. Full Release Workflow (Insertable Code Block)
Here is the final complete version for your blog (same one from our conversation):
Check it on GitHub here.
10. Troubleshooting Section (Because Something Will Break)
A friendly section explaining common issues:
❌ Error: “Write access to the repository not granted”
You’re cloning with the wrong credentials.
❌ Error: “Tag already exists”
We fixed this: workflow no longer fails.
❌ Error: “Requires a tag”
We fixed this by ensuring tag_name is always provided.
❌ Error: “empty ident name”
Configure Git identity inside the workflow.
11. Conclusion — You Now Have a Full CI/CD Pipeline
At this point, your GitHub repository practically maintains itself.
Push code → GitHub tests it → tags it → packages it → and publishes a release.
All you do is sip coffee and look wise.
And if something breaks?
Well… that’s what logs are for. And panic. And maybe a chocolate bar.