

Introduction
The Ubuntu Desktop Environment is one of the most user-friendly and feature-rich desktop environments in the Linux world. If you're coming from a Windows or macOS background, you'll find that Ubuntu's desktop provides an intuitive, powerful, and highly customizable experience.
In this post, we will dive into the Ubuntu desktop environment, providing an overview of its key components, how to navigate it, and how to make some basic customizations to suit your preferences. Whether you're a complete beginner or just someone looking to fine-tune their desktop experience, this guide will help you get the most out of Ubuntu's desktop environment.
1. Overview of the Ubuntu Desktop Environment
Ubuntu has gone through various desktop environments in the past, but since Ubuntu 17.10, it has officially adopted GNOME as its default desktop environment. GNOME is known for its clean, modern interface and focus on simplicity and ease of use.
1.1 The GNOME Desktop
The GNOME desktop environment is the default graphical user interface (GUI) for Ubuntu Desktop. It provides a sleek and polished experience with a focus on minimalism. GNOME emphasizes a distraction-free design, making it easier to focus on tasks without being overwhelmed by too many interface elements.
Some key features of GNOME include:
- The Activities Overview: A central place to manage open applications, switch between workspaces, and access your application launcher.
- The Dock: A bar that shows pinned applications and currently running apps, allowing for quick access and multitasking.
- Workspace Management: GNOME allows you to organize your work across multiple virtual desktops, called "workspaces."
1.2 Key Components of the Ubuntu Desktop
Ubuntu Desktop consists of several key components, each contributing to the overall user experience. These include:
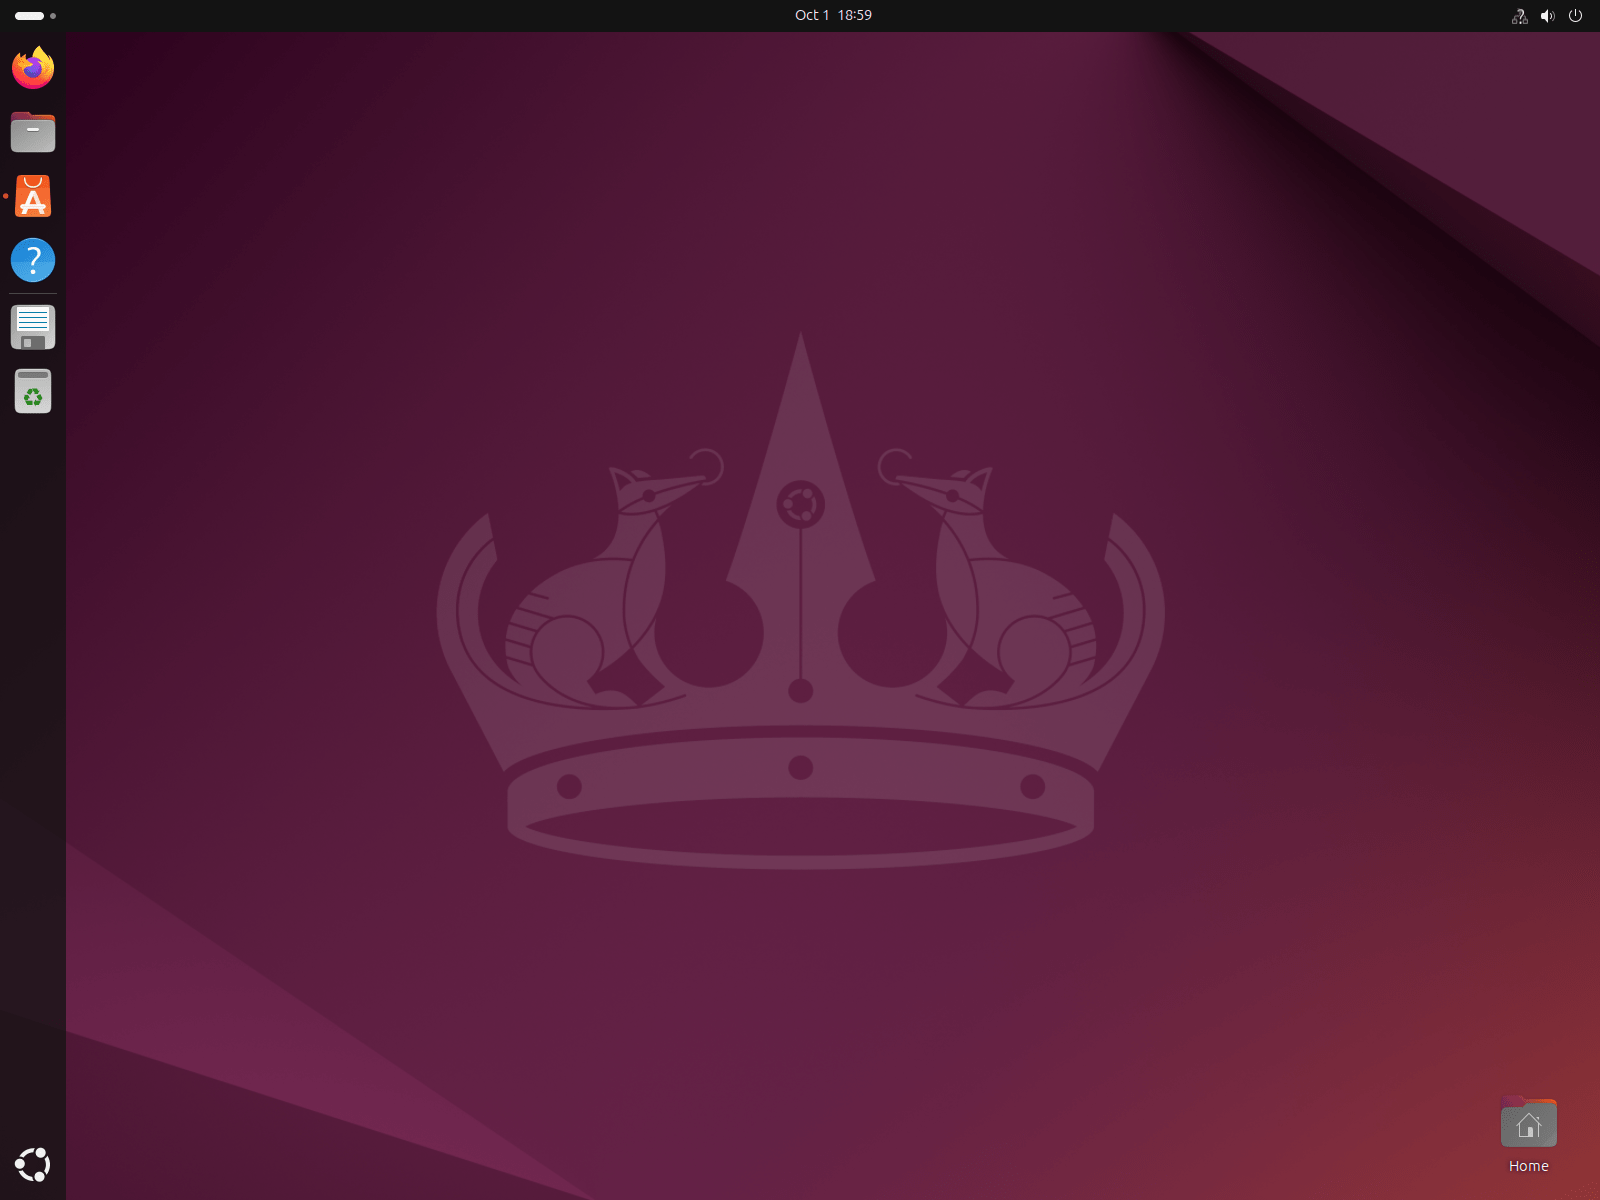
- The Top Bar: A system bar that spans the top of the screen and contains system icons, the clock, and access to the Activities Overview.
- The Dock: A vertical bar on the left side of the screen (by default) that holds your favorite and currently running applications.
- The Activities Overview: An interface that shows an overview of open windows and provides a search function for launching applications.
- The Application Launcher: A searchable menu that lets you find and open installed applications.
2. Navigating the Ubuntu Desktop
Navigating Ubuntu’s desktop environment is easy once you get familiar with its layout and key components.
2.1 The Top Bar
The Top Bar is located at the top of the screen and serves as your go-to place for quick system actions. It contains:
- Date and Time: At the center, you’ll see the current date and time. Clicking on it brings up a calendar with any upcoming events from your integrated calendars.
- System Tray Icons: On the right-hand side, you’ll see system status icons, such as network, sound, battery, and the power-off menu. These icons allow you to quickly change settings like volume, Wi-Fi, and access power options.
- User Menu: The far-right corner contains the user menu, which allows you to log out, switch users, lock the screen, or power off the system.
2.2 Activities Overview
To access the Activities Overview, you can either click on Activities in the top-left corner or press the Super key (Windows key on most keyboards). This opens an overview of all your open windows, workspaces, and a search bar.
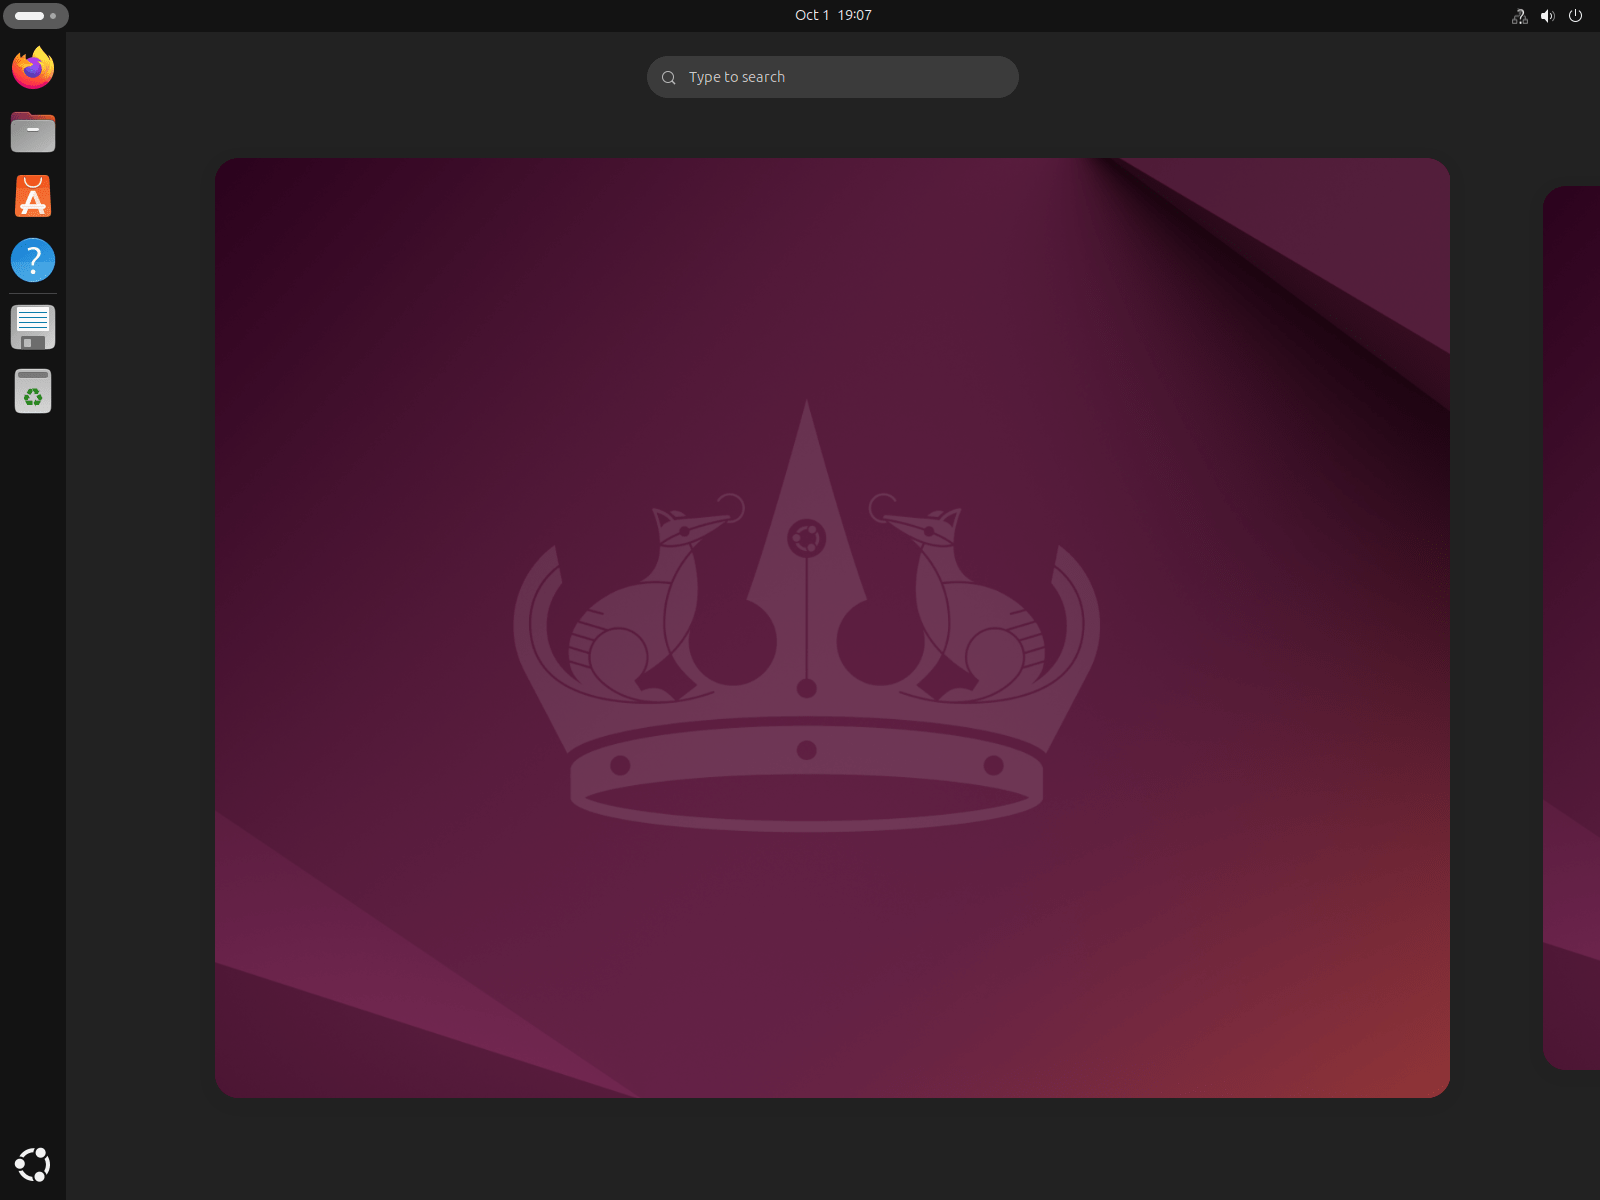
From here, you can:
- View all open windows: All open windows are displayed as thumbnails. You can click on any window to bring it to the front or switch to it.
- Search for applications: The search bar at the top lets you search for and launch applications, settings, files, and even web searches.
- Manage workspaces: You can switch between workspaces or drag windows between workspaces by using the sidebar on the right.
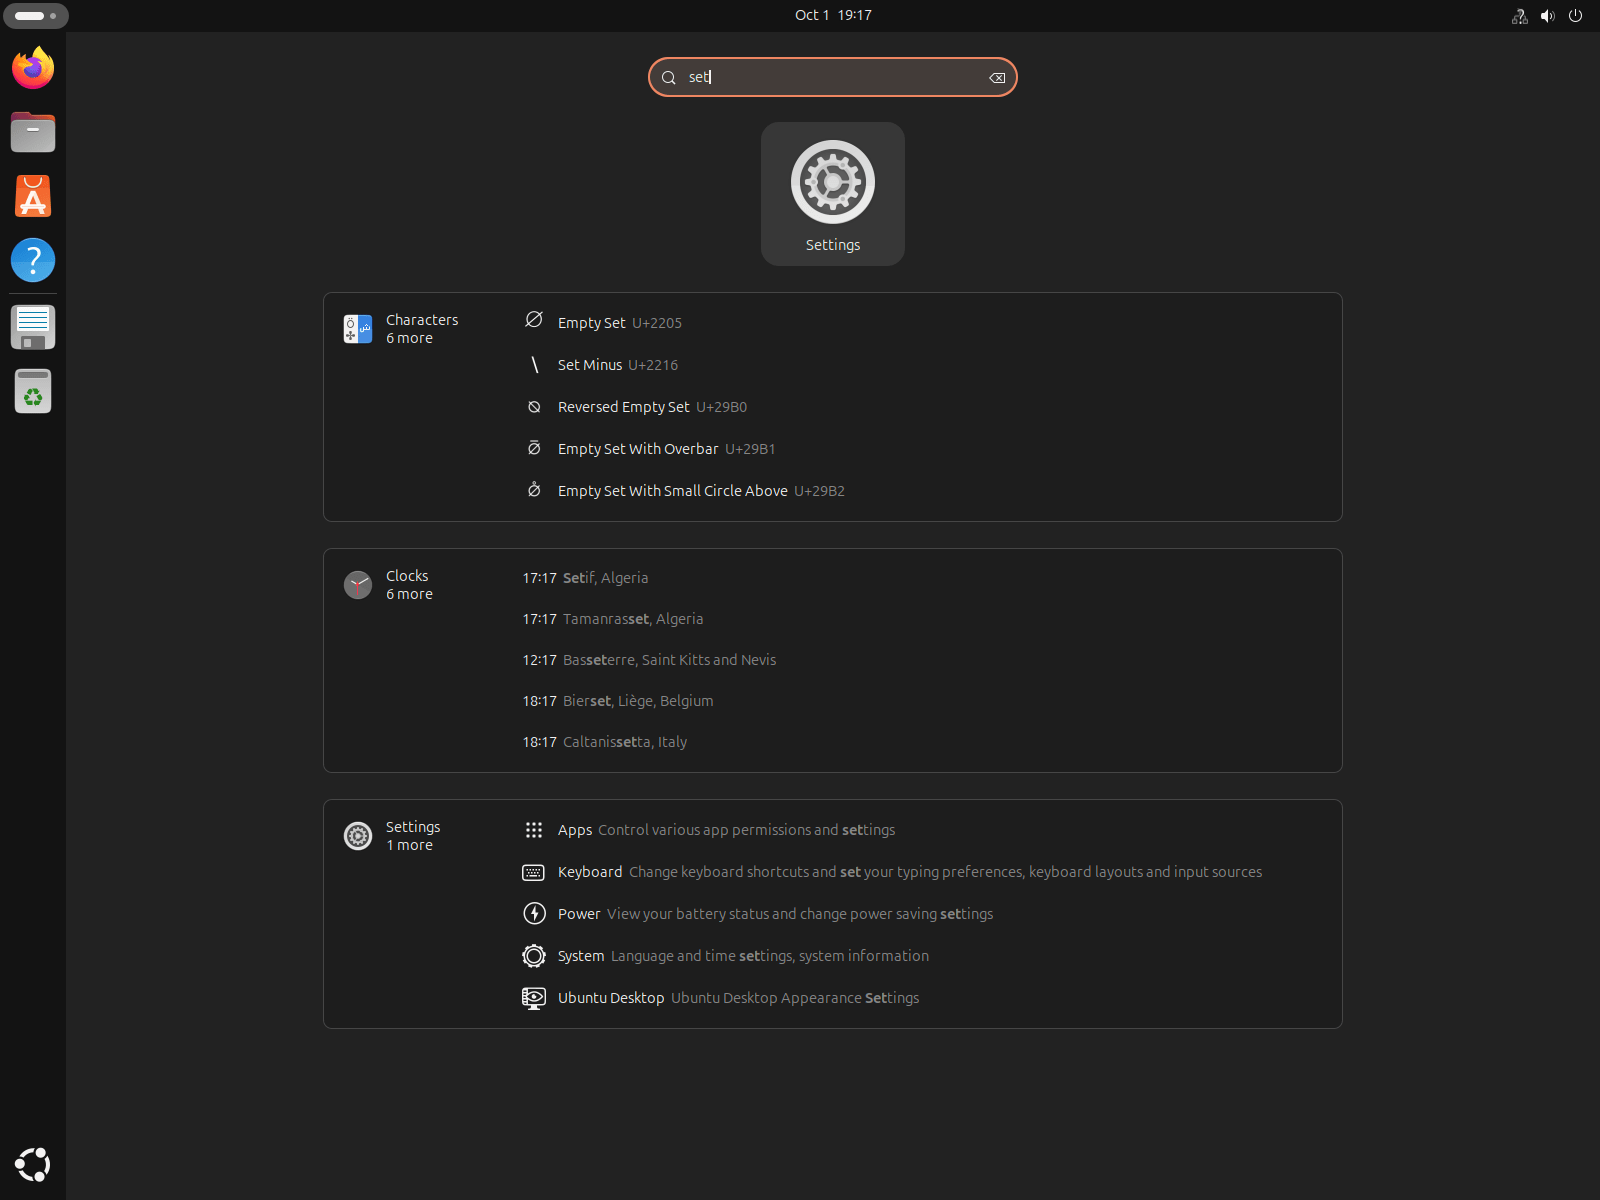
2.3 The Application Launcher
When you click on the "Show Applications" icon at the bottom of the Dock or press Super + A, the Application Launcher will open. This is where you can browse all installed applications, view frequently used apps, and search for any specific app.

The layout is simple: a grid of application icons. You can scroll through them or use the search bar to quickly locate the app you're looking for.
2.4 The Dock
The Dock is one of the most noticeable parts of the Ubuntu desktop. By default, it sits vertically on the left-hand side of the screen and contains both pinned (favorite) applications and icons for running applications.
- Pinning Applications: To pin an application to the Dock, simply right-click the app icon and choose "Add to Favorites."
- Unpinning: Similarly, you can unpin an app by right-clicking and choosing "Remove from Favorites."
You can also move the Dock to the bottom or right of the screen by adjusting the settings, which we'll cover later in this post.
2.5 Workspace Switching and Management
One of the powerful features of GNOME is its Workspace management. Workspaces allow you to organize different sets of open applications and windows, so you can work more efficiently.
In the Activities Overview, you’ll notice the workspaces appear as small thumbnails on the right side of the screen. You can switch between workspaces by clicking on the thumbnails or using keyboard shortcuts like Ctrl + Alt + Up/Down.
To move a window between workspaces, just drag the window to the desired workspace in the Activities Overview.
3. Customizing the Ubuntu Desktop
Ubuntu's desktop environment is highly customizable, allowing you to tweak the appearance and behavior to suit your preferences.
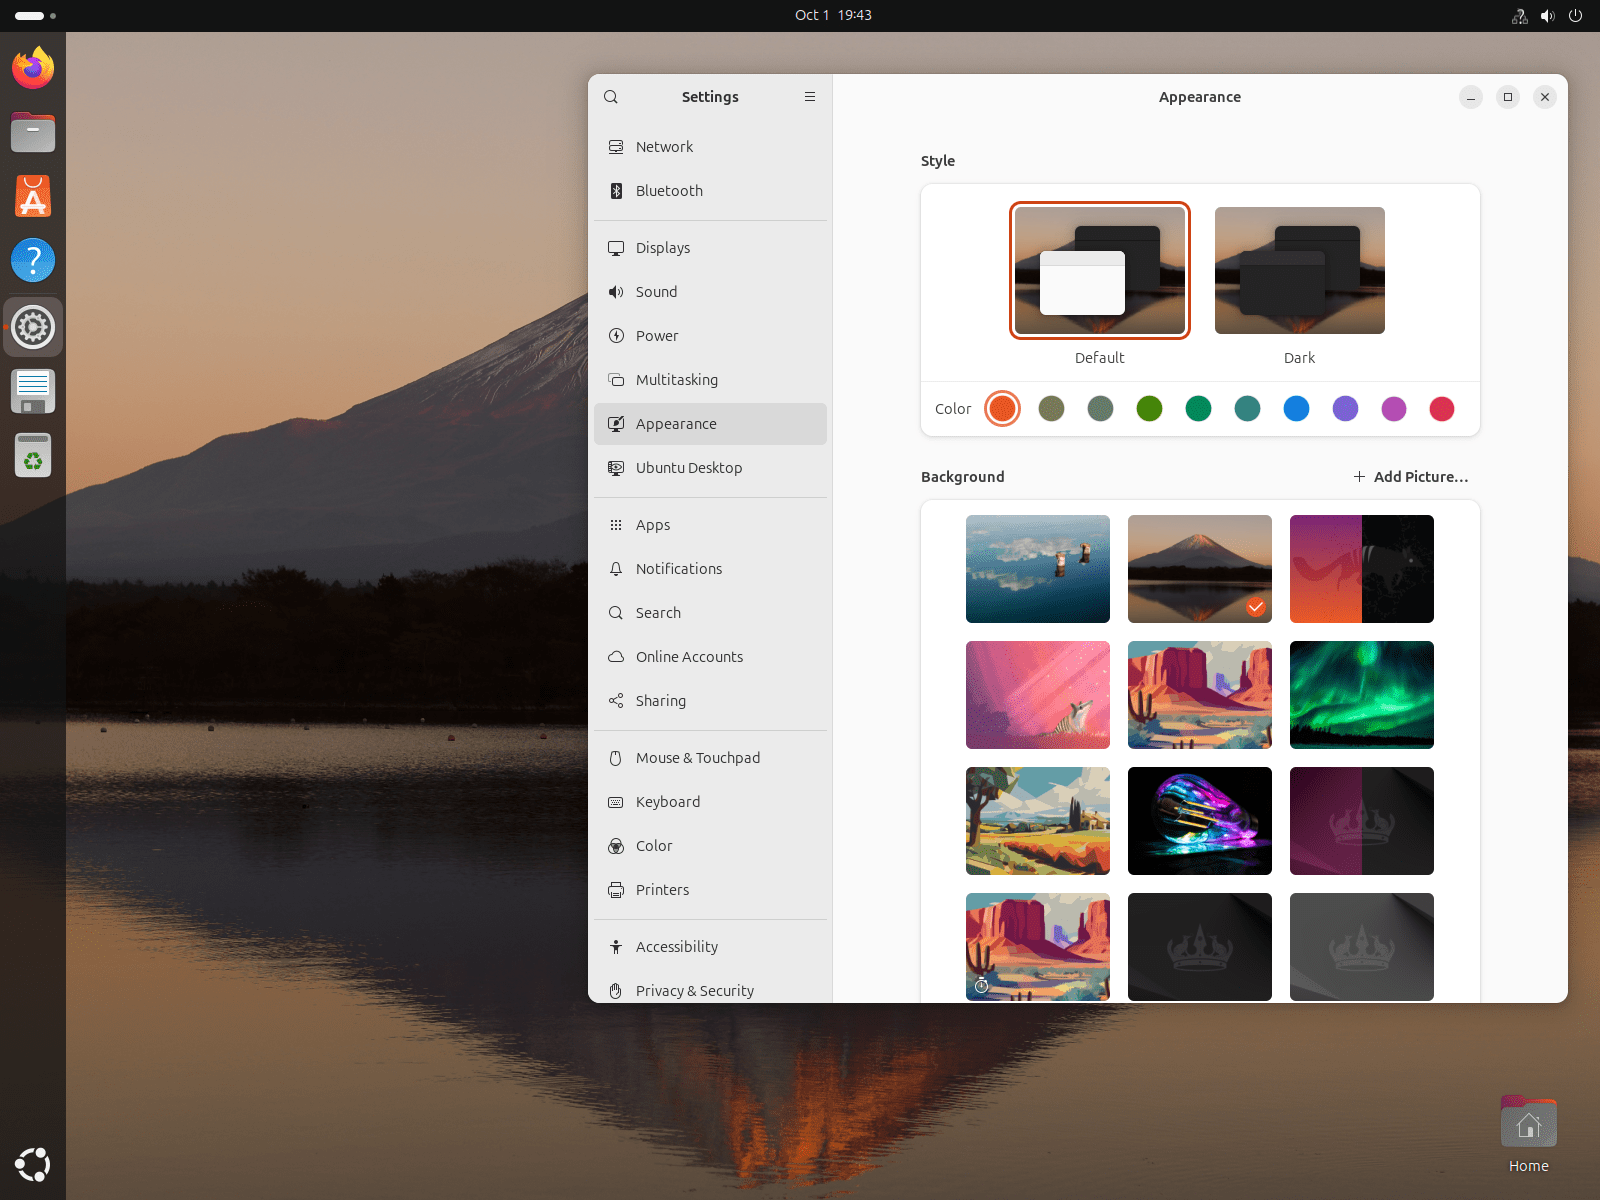
3.1 Changing the Desktop Background
One of the easiest and most popular ways to customize your desktop is by changing the wallpaper. Here's how you can do it:
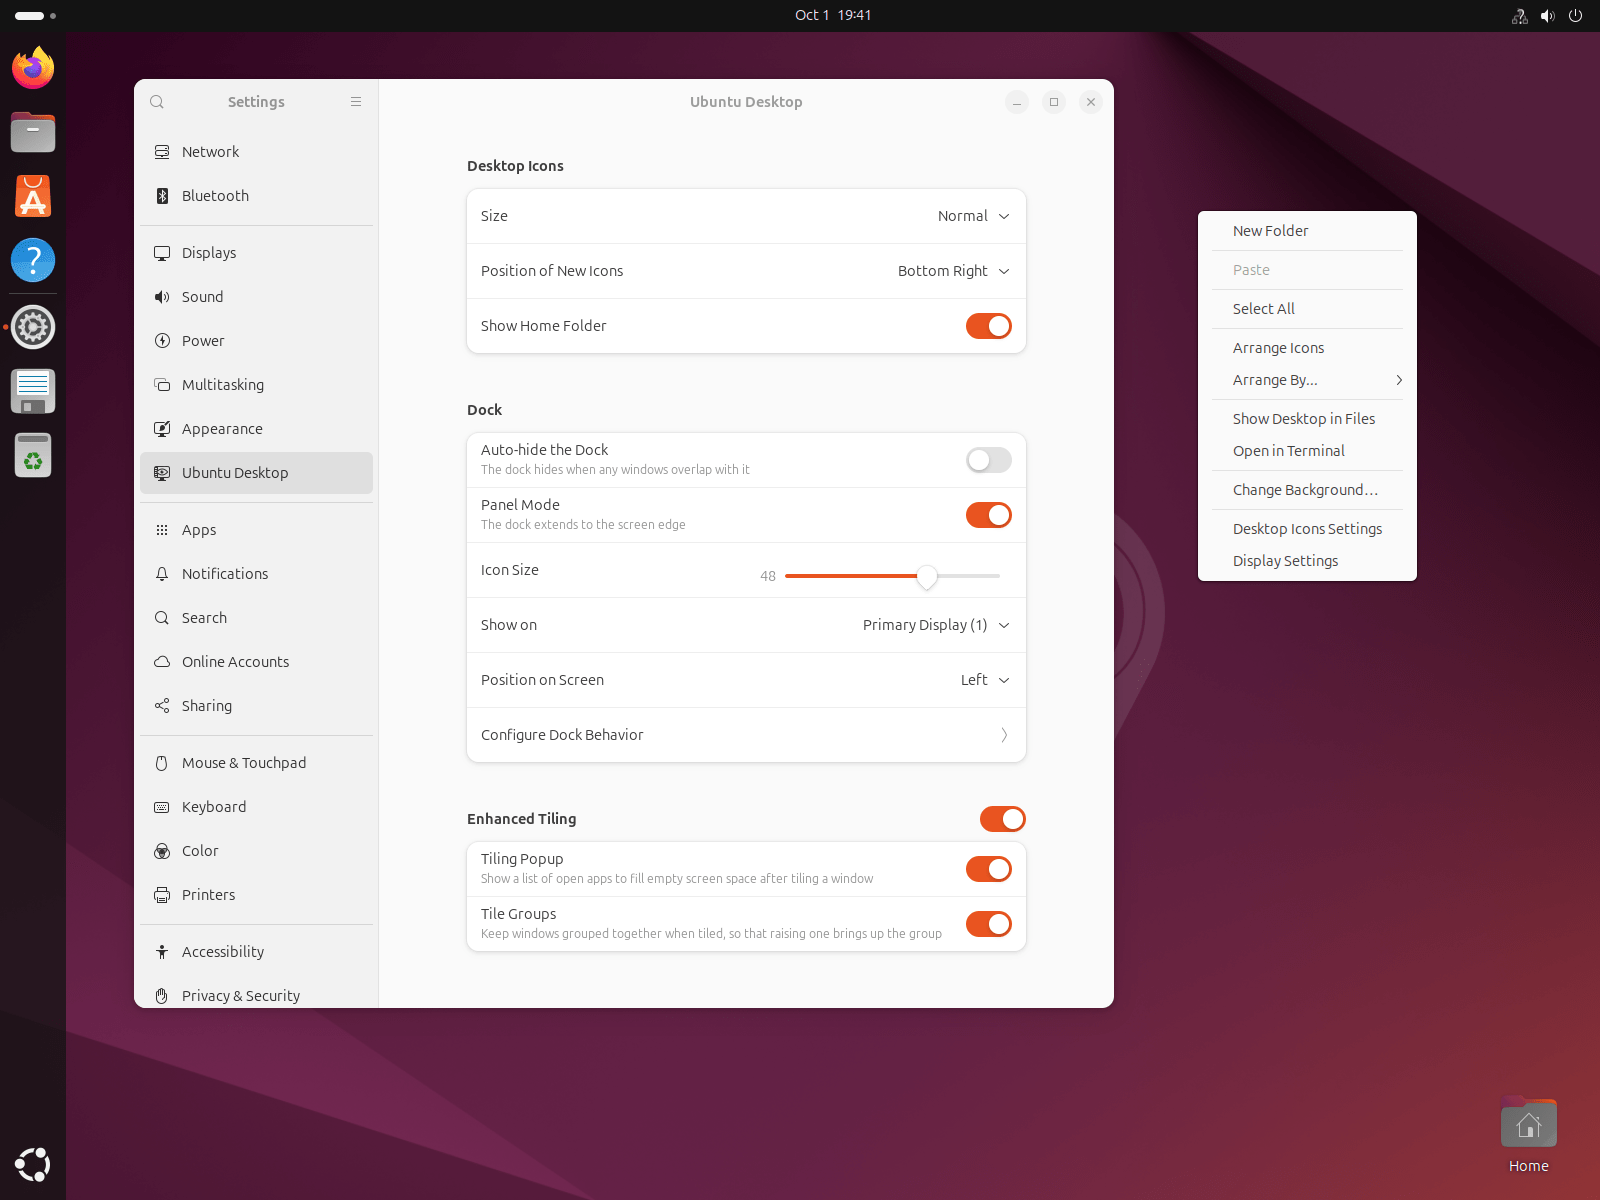
- Right-click on the desktop and select "Change Background".
- A window will open, allowing you to choose from the default wallpapers or upload your own.
- Select the wallpaper you want, and it will automatically apply to your desktop.
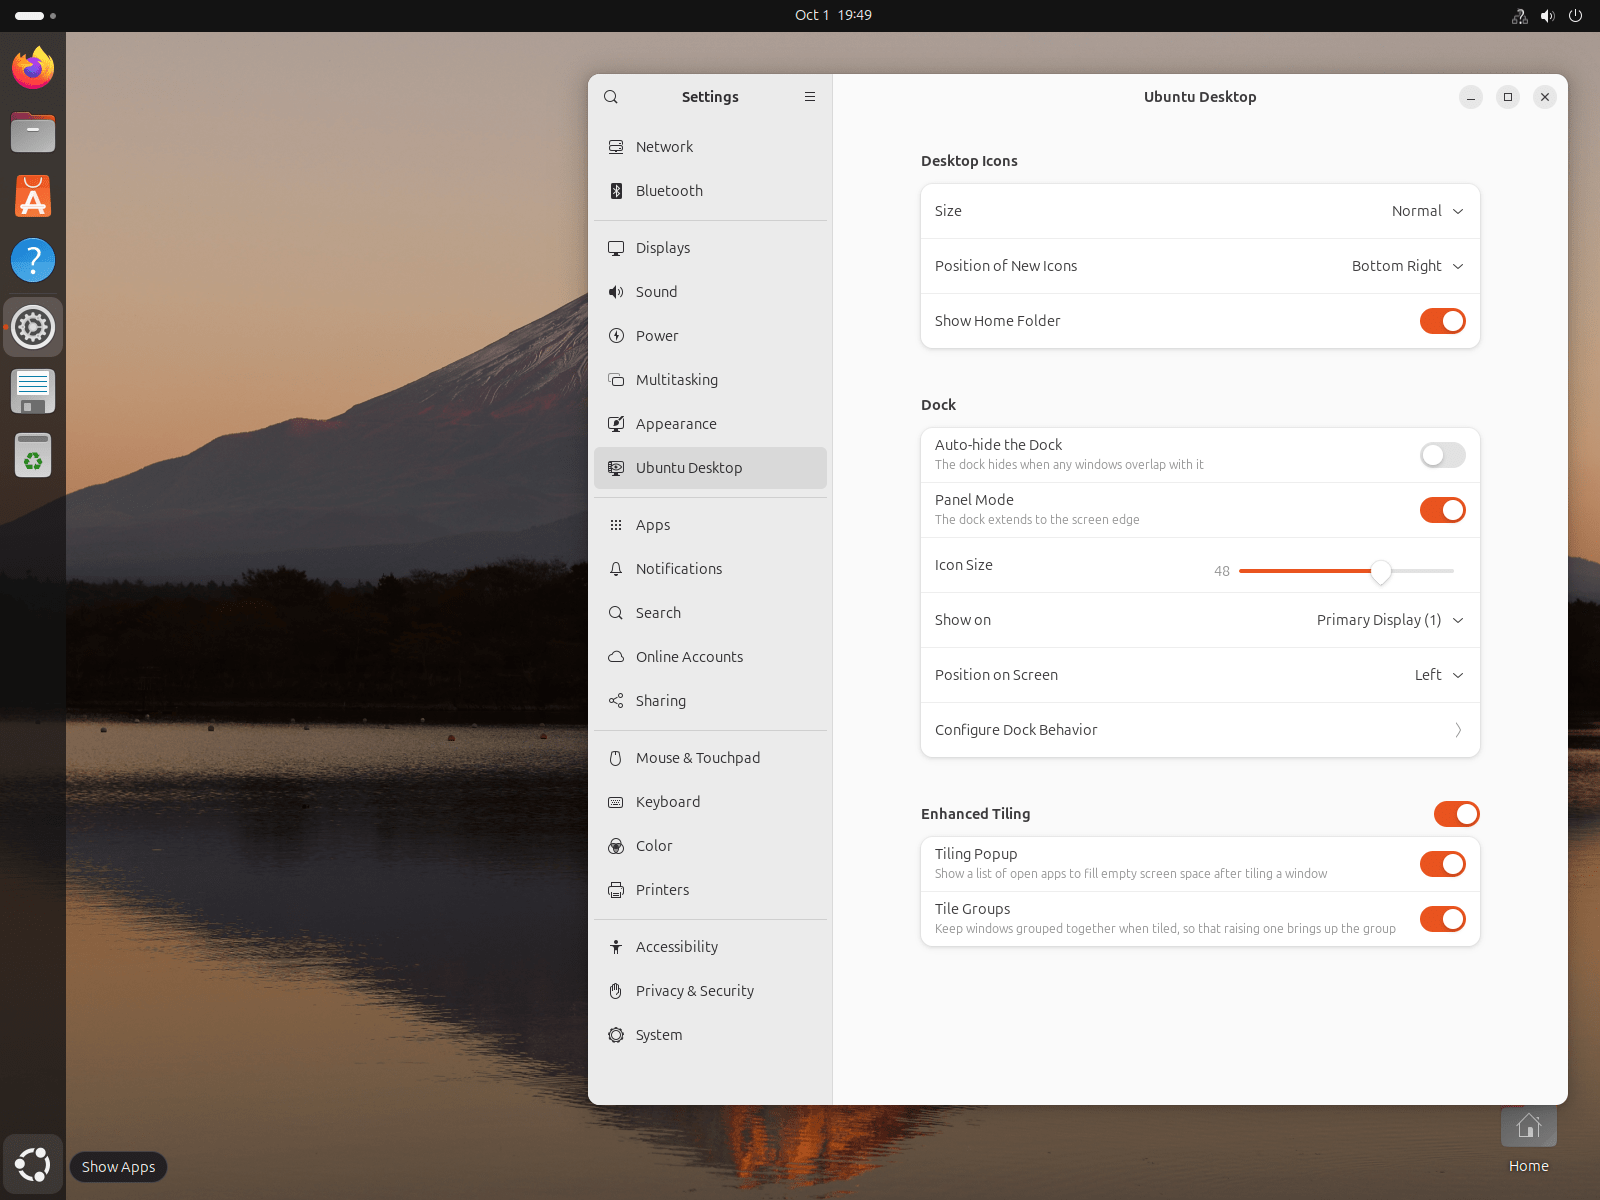
3.2 Adjusting the Appearance of the Dock
You can change the position, size, and behavior of the Dock through Settings.
- Open Settings by clicking on the "Show Applications" icon and searching for "Settings."
- Go to the Ubuntu Desktop section.
- From here, you can:
- Change the Dock's position to be on the left, right, or bottom of the screen.
- Adjust the icon size to make them larger or smaller.
- Enable or disable auto-hide so the Dock only appears when you move your mouse to its edge.
3.3 Managing Extensions and Themes
If you want to further customize the look and feel of your Ubuntu desktop, you can install GNOME Extensions and Themes.
- GNOME Extensions: These are small plugins that add additional functionality to the desktop, such as weather widgets, system monitors, or workspace indicators. You can manage extensions through the GNOME Extensions website or install the GNOME Tweaks tool.
- Themes: You can change the theme of the GNOME desktop, including icons, window borders, and the overall color scheme. Themes can be installed via GNOME Tweaks or downloaded from sites like GNOME Look.
4. Useful Keyboard Shortcuts in Ubuntu
Ubuntu’s GNOME desktop supports a variety of useful keyboard shortcuts that can help you navigate more efficiently:
- Super: Opens the Activities Overview.
- Super + A: Opens the Application Launcher.
- Super + D: Minimizes all windows and shows the desktop.
- Super + Left/Right Arrow: Snaps the window to the left or right half of the screen.
- Alt + Tab: Switches between open applications.
- Ctrl + Alt + Up/Down: Switches between workspaces.
Conclusion
The Ubuntu desktop environment is not only beautiful but also highly functional and easy to use. Whether you’re a seasoned Linux user or new to Ubuntu, the GNOME desktop provides an intuitive and customizable experience. By learning to navigate its key components like the Top Bar, Dock, and Activities Overview, and by mastering customizations like wallpaper changes and Dock behavior, you can tailor your desktop to suit your needs and make your computing experience even more enjoyable.
As we continue this series on Ubuntu Desktop Customization, you'll discover even more ways to personalize your setup and optimize your workflow. Stay tuned for the next post where we’ll dive into more advanced desktop customizations!