

Intro
There are moments in every tinkerer’s life when a small oversight turns into a full-blown adventure. Mine began with a piece of metal and plastic, an NVIDIA NVLink bridge, that arrived looking beautiful, promising, and entirely the wrong size.
So here I am, surrounded by two gleaming RTX 2080 Ti cards, one humming happily with a monitor plugged in, the other sitting headless like a silent twin waiting for its turn to shine. Without the NVLink bridge to tie them together, I decided to make the best of the situation: test, measure, and document everything.
The results, I soon discovered, were as fascinating as they were unpredictable. Before diving into Vulkan and DirectX layers later on, this part of the experiment focuses purely on OpenGL — the cornerstone of Linux graphics and the first sanity check for any gaming or rendering setup.
But let’s start from the very beginning — by disabling the NVIDIA drivers entirely and seeing how OpenGL performs when running purely on the CPU through the Nouveau open-source driver.
What is the Nouveau Driver?
Nouveau is the open-source graphics driver for NVIDIA GPUs, developed by the Linux community. It’s included by default in most Linux distributions and provides basic 2D and 3D acceleration without needing NVIDIA’s proprietary driver. While it offers excellent compatibility and freedom, its performance and feature support—especially for newer GPUs—are limited compared to the official NVIDIA driver, mainly because it lacks access to NVIDIA’s proprietary firmware and power-management technologies.
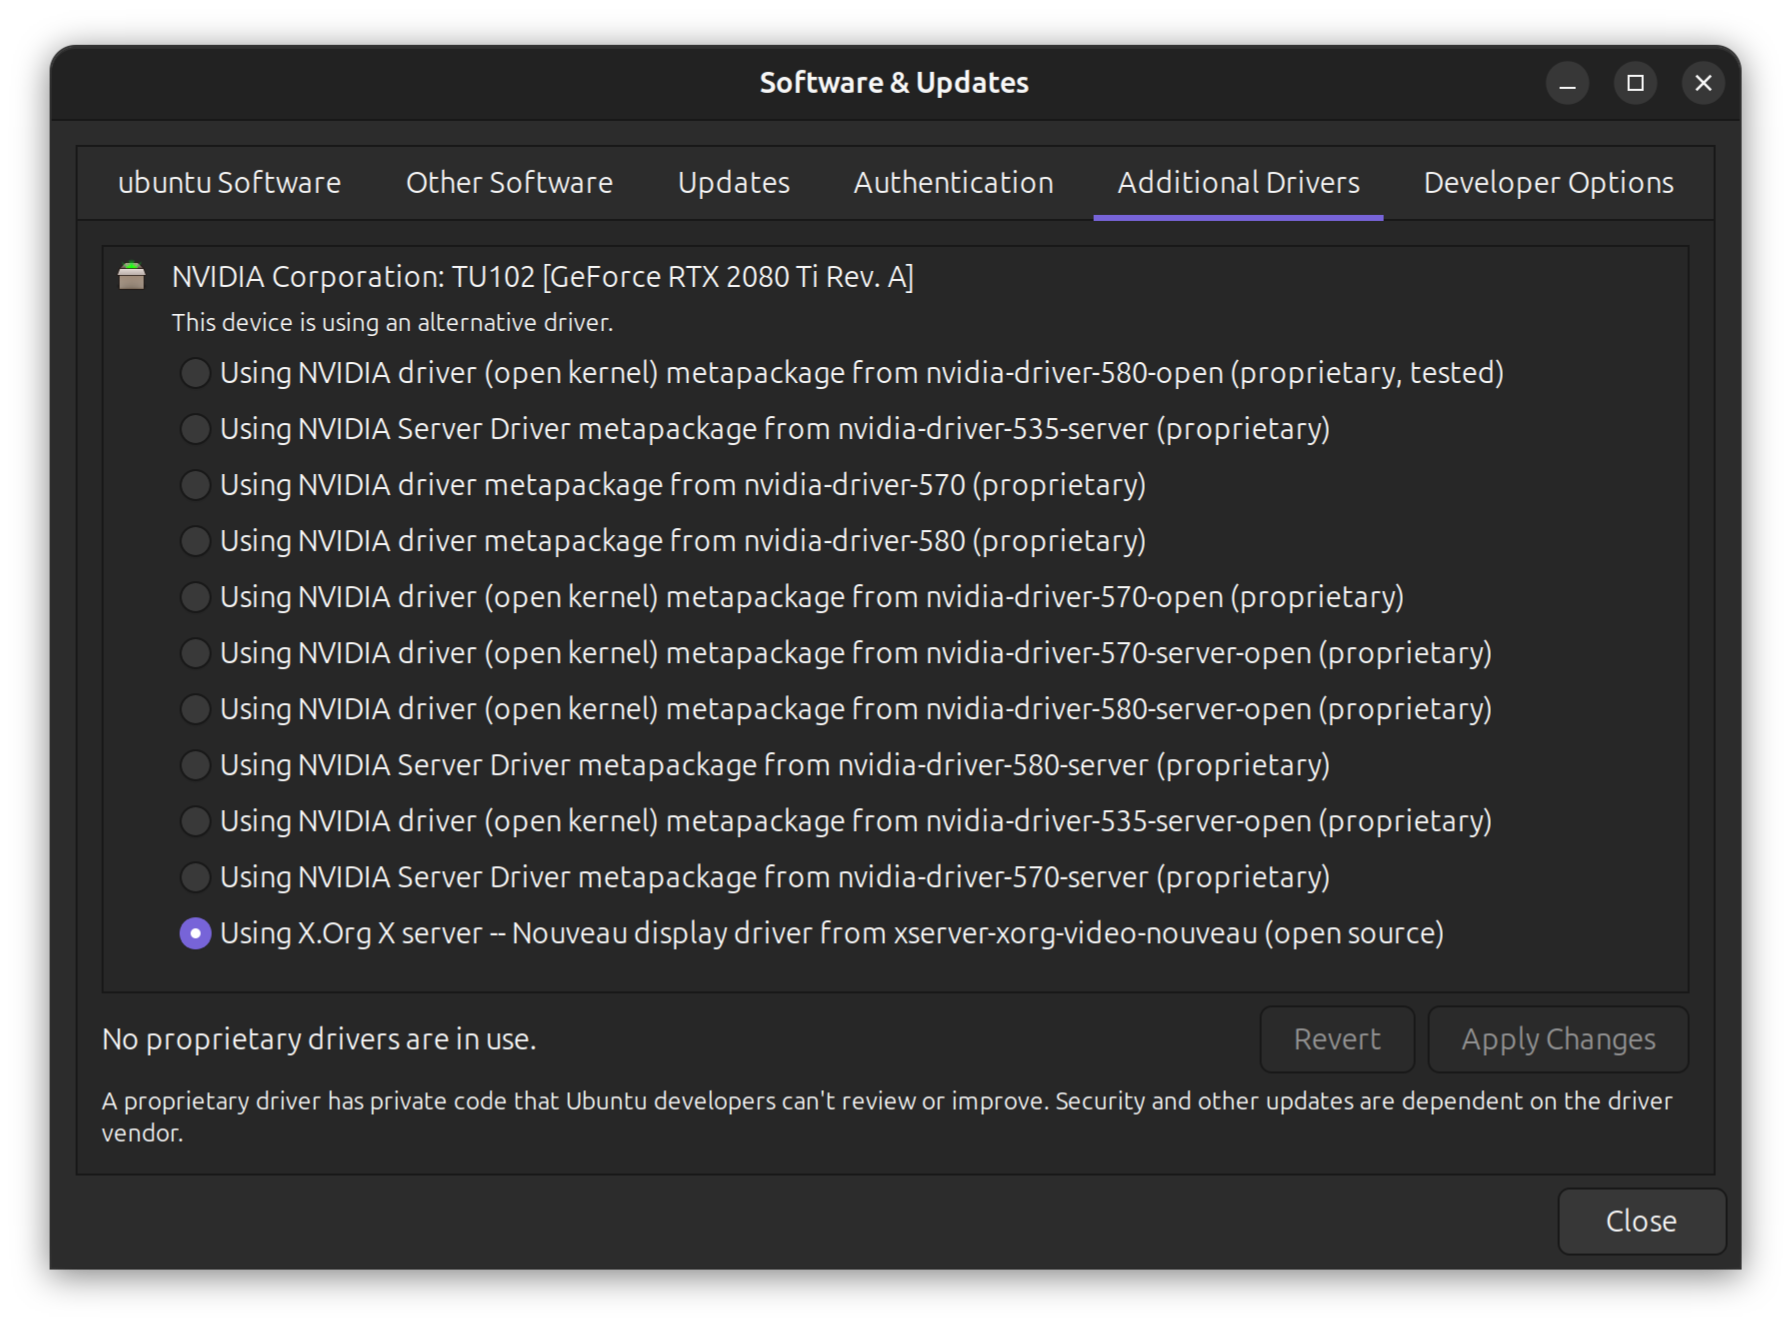
Open the Additional Drivers application on Ubuntu, and select “Using X.Org X server – Nouveau display driver from xserver-xorg-video-nouveau (open source)”, click Apply Changes, and then reboot your system.
1. Installing and Using GLXGears & GLXInfo on Ubuntu
Before diving into benchmarks and OpenGL performance, let’s make sure we have our tools ready. Two classic — yet incredibly handy — utilities for testing GPU rendering and verifying OpenGL configuration on Linux are glxgears and glxinfo. Both come bundled in the same package: mesa-utils.
1.1 Installing mesa-utils
Open your terminal (Ctrl + Alt + T) and refresh your repositories to ensure you’re pulling the latest package data:
sudo apt update
Then install the utilities:
sudo apt install mesa-utils -y
This will add both glxgears and glxinfo to your system.
1.2 Get the renderer information
To confirm the benchmark is actually running on the CPU, check the renderer string:
glxinfo | grep "OpenGL renderer"
Expected output:
OpenGL renderer string: llvmpipe (LLVM 15.0.7, 256 bits)
If you see an NVIDIA or AMD GPU model listed, hardware acceleration is still active. But if any:
glxinfo | grep "OpenGL renderer"
glx: failed to create dri3 screen
failed to load driver: nouveau
OpenGL renderer string: llvmpipe (LLVM 20.1.2, 256 bits)
1.3 Running glxgears
To launch the gears test:
glxgears
A small window will appear with three colorful rotating gears — a time-honored tradition for Linux GPU testing.
Your terminal will start printing frame rates similar to this:
Running synchronized to the vertical refresh.  The framerate should be
approximately the same as the monitor refresh rate.
301 frames in 5.0 seconds = 60.123 FPS
This is a basic OpenGL rendering test, not a full benchmark, but it gives you a quick sanity check. If the gears are smooth, your OpenGL stack are alive and well.
On my system, it was more like 22 FPS:
Running synchronized to the vertical refresh.  The framerate should be
approximately the same as the monitor refresh rate.
117 frames in 5.0 seconds = 23.326 FPS
112 frames in 5.0 seconds = 22.382 FPS
114 frames in 5.0 seconds = 22.770 FPS
113 frames in 5.1 seconds = 22.170 FPS
112 frames in 5.0 seconds = 22.334 FPS
114 frames in 5.0 seconds = 22.611 FPS
114 frames in 5.0 seconds = 22.617 FPS
115 frames in 5.0 seconds = 22.874 FPS
113 frames in 5.0 seconds = 22.412 FPS
114 frames in 5.1 seconds = 22.494 FPS
114 frames in 5.0 seconds = 22.717 FPS
114 frames in 5.0 seconds = 22.710 FPS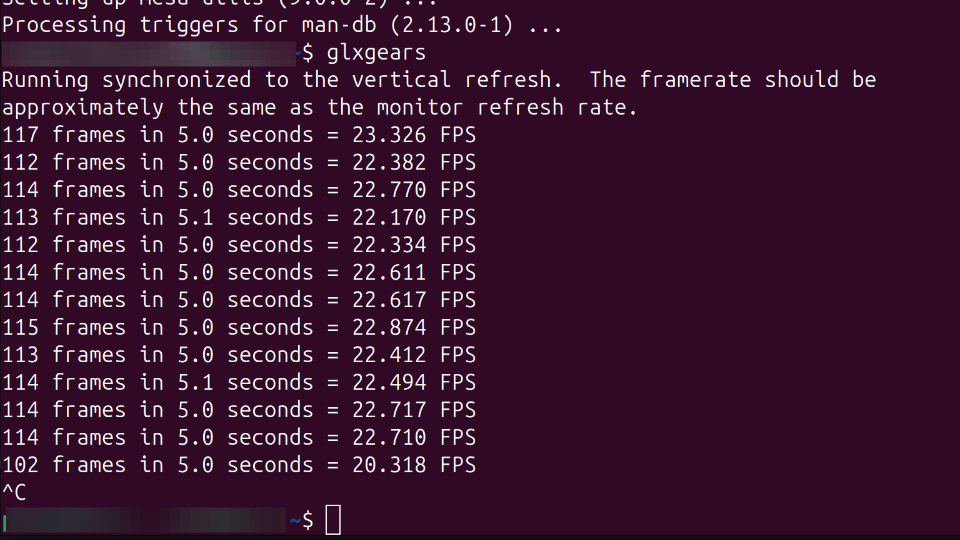
1.4 Short summary
glxgears is the Linux equivalent of a heartbeat test for your GPU — if it spins, your graphics stack is alive.glxinfo is your magnifying glass — it tells you what is spinning it.
Both tools are lightweight, fast to install, and absolutely essential before deeper benchmarking with tools like GLMark2 or real-world gaming performance analysis.
1.5 Running glxgears with VSynv disabled
After running glxgears normally, you’ll notice the frame rate is very low and may indicate that VSync is ON. VSync—typically matching your monitor’s refresh rate (e.g., 60 FPS). To see the real performance potential, you need to disable VSync. Let’s do that and measure the uncapped frame rate next. Add an environment variable vblank_mode=0 before the command:
blank_mode=0 glxgearsThe results:
ATTENTION: default value of option vblank_mode overridden by environment.
4986 frames in 5.0 seconds = 997.109 FPS
4864 frames in 5.0 seconds = 972.750 FPS
4923 frames in 5.0 seconds = 984.584 FPS
4926 frames in 5.0 seconds = 985.032 FPS
4935 frames in 5.0 seconds = 986.860 FPS
4925 frames in 5.0 seconds = 984.807 FPS
4900 frames in 5.0 seconds = 979.978 FPS
4810 frames in 5.0 seconds = 961.899 FPS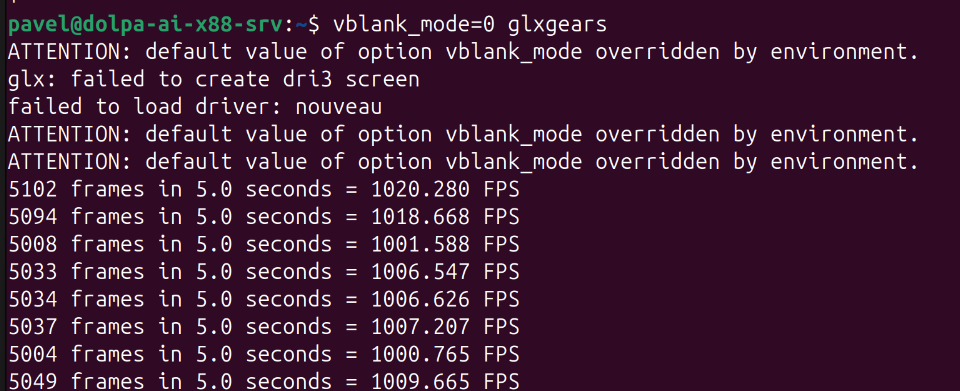
And just to make sure we are not using Hardware Acceleration, let's add another Environment variable:
LIBGL_ALWAYS_SOFTWARE=1 vblank_mode=0 glxgears1.6 Making some "load"
On my system with 44 CPU cores and 88 threads, a single glxgears run doesn’t generate any noticeable load. So, I decided to launch 44 instances in parallel—just to make sure the CPUs are actually doing some work:
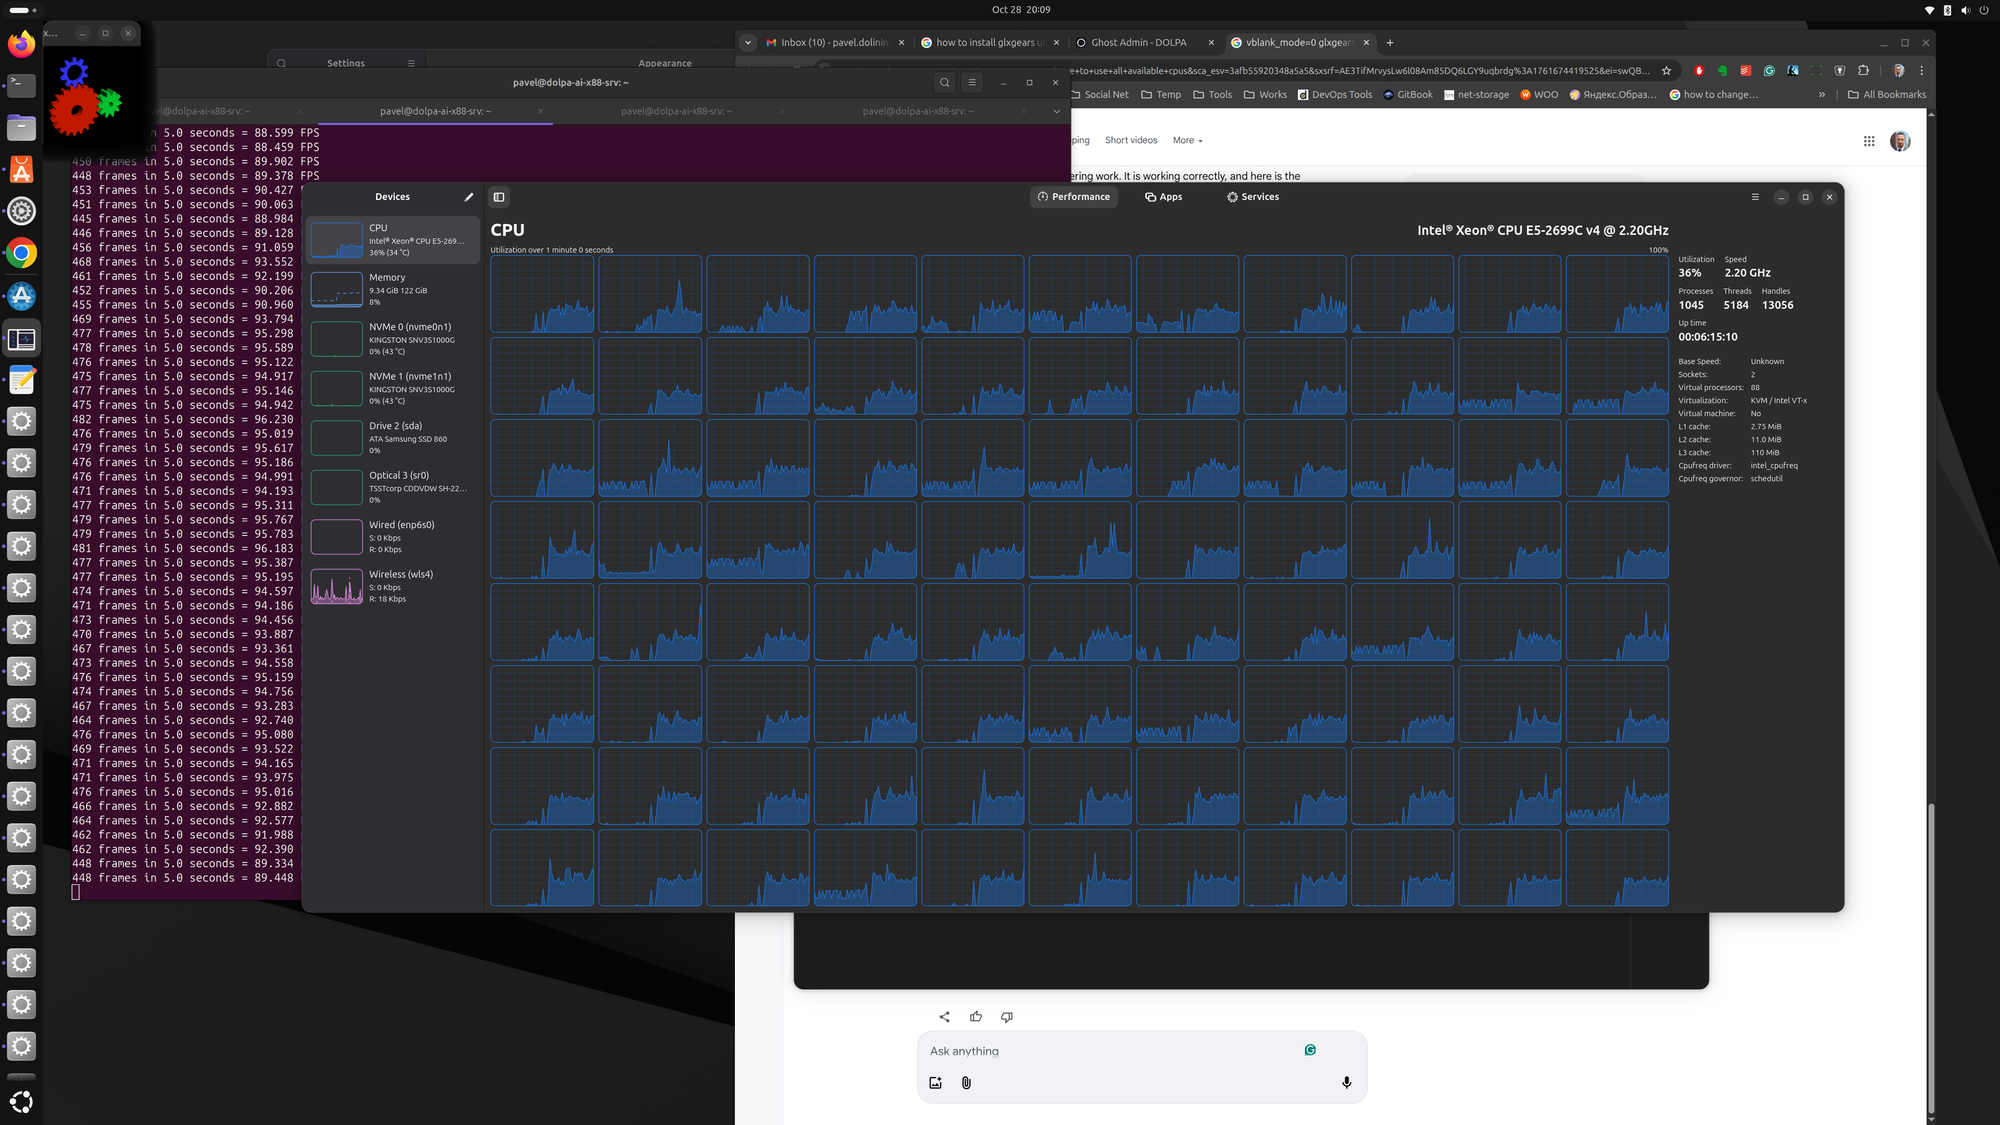
I was getting 40 FPS from every one of the running glxgear.
2. Benchmarking CPU-Based OpenGL Rendering with glmark2
After testing OpenGL performance using glxgears, it’s time to move on to a more advanced benchmarking tool — glmark2.
Unlike glxgears, which only gives a rough FPS number, glmark2 performs a full suite of rendering tests covering lighting, shaders, and texture operations.
In this chapter, we’ll install and run glmark2 using CPU-based rendering, allowing us to see how your processor handles OpenGL tasks without GPU acceleration — an essential step before NVLink arrives and the GPUs take over.
2.1 Choosing the Right glmark2 Package for Ubuntu 25.04 (Wayland Edition)
Before running any OpenGL benchmarks, I needed to sort out something that at first looked trivial — which glmark2 package to actually use.
As it turns out, there are several of them, each designed for slightly different display systems and APIs. And if you pick the wrong one, your benchmark might either fail to start… or silently fall back to a completely different renderer.
Since I’m testing OpenGL performance on CPU (without NVLink or GPU acceleration), this step was worth doing carefully.
2.2 Understanding the glmark2 Family
All glmark2 packages contain the same core benchmarking suite — the same spinning objects, shader tests, and texture stress scenes.
The real difference lies in how they talk to your graphics stack: which API they use, and whether they expect X11, Wayland, or no display server at all.
Here’s how they break down:
Core Data Package glmark2-data - contains all the textures, shaders, and models used by every variant of the benchmark. You don’t need to install it manually — it’s automatically pulled in when you install any glmark2 version.
Display Server Variants:
glmark2-x11 – The traditional build, designed for systems running under the X11 windowing system.
glmark2-wayland – The modern version that integrates with the Wayland display server (the default on Ubuntu 25.04).
glmark2-drm – Runs directly on the Direct Rendering Manager (DRM) without any windowing system. This is perfect for headless or embedded testing environments.
OpenGL API Variants:
Packages without -es2- (e.g., glmark2-x11, glmark2-wayland) use standard OpenGL 2.0 — the full, desktop-grade version.
Packages with -es2- (e.g., glmark2-es2-x11, glmark2-es2-wayland, glmark2-es2-drm) use OpenGL ES 2.0, a lighter API designed for mobile devices, embedded systems, and virtualized GPUs.
Since I’m testing under a virtualized environment with Nova driver and doing software rendering on CPU, the ES2 variant makes more sense — it’s simpler, faster to initialize, and better reflects the kind of rendering used in virtual GPU or Mesa-based environments.
| Environment | Recommended Package | Notes |
|---|---|---|
| Ubuntu 25.04 desktop (Wayland) | glmark2-es2-wayland |
Best for CPU tests with visible output |
| Legacy X11 session | glmark2-es2-x11 |
Still supported, but less relevant |
| Headless / Nova driver VM | glmark2-es2-drm |
Ideal for CLI-based benchmarks |
2.3 What to Install on Ubuntu 25.04 (Wayland)
Ubuntu 25.04 now defaults to Wayland, so if you’re running on a regular desktop session and want the benchmark to appear in a window, the best option is:
sudo apt update
sudo apt install glmark2-es2-wayland
This will automatically bring in the required data package (glmark2-data) and link to the Wayland display server.
If you’re testing headless or via SSH (for example, on a secondary machine or a VM without display output), use the DRM version instead:
sudo apt install glmark2-es2-drm
This runs entirely in the terminal — no GUI required.
2.4 Why I’m Using glmark2-es2-wayland
In my current setup — two GPUs waiting for NVLink and OpenGL running on CPU — I’m sticking with glmark2-es2-wayland.
Here’s why:
- Ubuntu 25.04’s default session runs on Wayland, not X11.
- I want a visible test window to confirm rendering works properly on the CPU renderer.
- I can later switch easily to
glmark2-es2-drmfor remote or automated runs.
When the benchmark runs, I’ll force it to use software rendering with:
LIBGL_ALWAYS_SOFTWARE=1 glmark2-es2-wayland
That ensures every frame is computed on the CPU — giving me a proper baseline before GPU acceleration comes into play.
2.5 Headless Systems (DRM/KMS Mode)
If you’re running the tests remotely or on a system without a desktop interface, use the DRM/KMS version of glmark2.
Install it with:
sudo apt update
sudo apt install -y glmark2-es2-drm
Then run it in CPU mode:
LIBGL_ALWAYS_SOFTWARE=1 glmark2-es2-drm
This version outputs results directly to the terminal — perfect for SSH sessions or automated benchmarks.
2.6 Notes on Drivers and Nova
glmark2 is driver-agnostic — it automatically uses whatever OpenGL implementation is active on your system.
If you’re using the Nova driver (common in OpenStack or virtualized setups), glmark2 will use it without any special configuration.
The same applies to Mesa, NVIDIA, and AMD drivers.
2.7 Results of glmark2
glx: failed to create dri3 screen
failed to load driver: nouveau
** GLX does not support GLX_EXT_swap_control or GLX_MESA_swap_control!
** Failed to set swap interval. Results may be bounded above by refresh rate.
=======================================================
    glmark2 2023.01
=======================================================
    OpenGL Information
    GL_VENDOR:      Mesa
    GL_RENDERER:    llvmpipe (LLVM 20.1.2, 256 bits)
    GL_VERSION:     4.5 (Compatibility Profile) Mesa 25.0.7-0ubuntu0.25.04.2
    Surface Config: buf=32 r=8 g=8 b=8 a=8 depth=24 stencil=0 samples=0
    Surface Size:   800x600 windowed
=======================================================
** GLX does not support GLX_EXT_swap_control or GLX_MESA_swap_control!
** Failed to set swap interval. Results may be bounded above by refresh rate.
[build] use-vbo=false: FPS: 344 FrameTime: 2.915 ms
** GLX does not support GLX_EXT_swap_control or GLX_MESA_swap_control!
** Failed to set swap interval. Results may be bounded above by refresh rate.
...
** GLX does not support GLX_EXT_swap_control or GLX_MESA_swap_control!
** Failed to set swap interval. Results may be bounded above by refresh rate.
[loop] fragment-loop=false:fragment-steps=5:vertex-steps=5: FPS: 340 FrameTime: 2.947 ms
** GLX does not support GLX_EXT_swap_control or GLX_MESA_swap_control!
** Failed to set swap interval. Results may be bounded above by refresh rate.
[loop] fragment-steps=5:fragment-uniform=false:vertex-steps=5: FPS: 346 FrameTime: 2.895 ms
** GLX does not support GLX_EXT_swap_control or GLX_MESA_swap_control!
** Failed to set swap interval. Results may be bounded above by refresh rate.
[loop] fragment-steps=5:fragment-uniform=true:vertex-steps=5: FPS: 325 FrameTime: 3.080 ms
=======================================================
                                  glmark2 Score: 345
=======================================================
The Final Score of glmark2 is 345.
2.8 Interpreting the Results
The final score represents your system’s OpenGL 4.5 rendering performance.
When running on the CPU, this score will be drastically lower than GPU results, but that’s the point — you’re establishing a baseline performance for pure software rendering.
Once the NVLink bridge arrives and you re-enable GPU rendering, these numbers will show just how much acceleration your dual-GPU setup provides.
2.9 Troubleshooting
- Performance extremely low: That’s expected for CPU mode — each OpenGL call is emulated in software.
- Benchmark doesn’t start in headless mode: Try specifying a virtual terminal:
sudo LIBGL_ALWAYS_SOFTWARE=1 glmark2-es2-drm --run-forever
I kept getting the following error all the time:
Error: Failed to find a suitable connector
Error: main: Could not initialize canvas
And no matter what I tried, I couldn't get any of the DRM variants to work 🙁.
Summary
Running glmark2 in CPU rendering mode is the purest way to measure raw OpenGL performance without hardware help.
It’s not glamorous, but it provides an essential baseline — a quiet before the storm.
Once your NVLink arrives, the comparison between CPU and GPU results will reveal just how much muscle those GPUs actually add to your system.