

Intro
Over the last few posts, my little HHGTTG Bash module has already helped us walk through several essential parts of real-world development on GitHub — from publishing code to adding tests and improving the installer. Now it’s time to look at another core skill every developer needs: opening a proper issue. And to make it practical, I’ll use my own module as the example once again.
In this post, I’ll intentionally file a bug against my own project and show you, step by step, how to create a clear, useful issue on GitHub — the kind of issue maintainers love instead of fear.
1. Why Issues Matter
Purpose - An issue is the canonical place for bugs, feature requests, questions about usage, and tasks that need tracking.
Public record - Every conversation stays forever (unless manually deleted) and is searchable, making it a knowledge base for the whole community.
Workflow trigger - Issues can drive CI pipelines (e.g., automatically create a draft PR), update project boards, and fire webhooks for external integrations.
Note – Some projects use Discussions for open‑ended conversations, design brainstorming, or “show‑and‑tell”. If a repository explicitly tells you to use Discussions for a particular type of feedback, respect that.
2. Prerequisites
| Requirement | How to satisfy it |
|---|---|
| GitHub account | Sign up at https://github.com/join. You need a verified email address to be able to comment on or edit issues. |
| Permission to file an issue | Most public repos allow anyone to open an issue. Private repos may require you to be a collaborator, a member of the organization, or have read access. |
| Optional – GitHub Desktop / CLI | If you like to stay in the terminal, the GitHub CLI (gh) can create issues without leaving the shell (covered in § 8). |
| Optional – Screenshot tool | e.g., macOS Screenshot (⌘⇧4), Windows Snipping Tool, Linux gnome‑screenshot, or a third‑party tool like ShareX (Windows) or Flameshot (Linux). |
| Optional – Code snippet host | For large logs you may want to paste them to https://gist.github.com and link from the issue. |
3. Finding the Right Repository
- Navigate – Go to https://github.com/, navigate to the Repositories tab, or search for the repo in top search bar. Then select the repo that looks most appropriate.
- Verify – Make sure you’re looking at the upstream (official) repo, not a fork:

- The banner under the repo name will say “Forked from …” if it’s a fork.
- Look for the owner name (e.g.,
microsoft/vscode).
- Check the Issues tab – If the repository already has many closed issues that look similar to yours, you may be able to find a solution without filing a new one.
Search – Use the top‑right search bar on GitHub:
https://github.com/search?q=<your‑project+name>
4. Understanding Issue Templates
Many mature projects ship issue templates to guide reporters. Templates are stored in the repo under one of the following locations:
| Path | Description |
|---|---|
.github/ISSUE_TEMPLATE/*.md |
Global templates for the entire organization (if the repo is in an org). |
.github/ISSUE_TEMPLATE/*.yml |
YAML‑based GitHub Issue Forms (newer, more structured). |
docs/ISSUE_TEMPLATE/*.md |
Some projects keep them in a docs/ folder. |
4.1 Detecting a Template
- Go to the Issues tab → click New issue.
- If the repo provides templates, you’ll see a “Choose a template” screen (no templates on my repo).

4.2 Selecting the Correct Template
Usually, you will see the following templates:
| Template type | When to use it |
|---|---|
| Bug report | The repository is behaving incorrectly, crashes, or shows incorrect output. |
| Feature request | You want a new capability, API, UI change, etc. |
| Documentation | The docs are wrong, missing, or unclear. |
| Security | Vulnerability disclosure – use the Security tab instead of a public issue. |
| Custom form (YAML) | The repo uses GitHub Issue Forms that ask you to fill out fields (dropdowns, checkboxes). |
4.3 Working with Templates Locally
If you’re a contributor who often files issues, you can clone the repository and copy the template to your own workspace:
git clone https://github.com/<owner>/<repo>.git
cd <repo>/.github/ISSUE_TEMPLATE
# copy the template you want to edit locally
cp bug_report.md ~/my‑issue‑templates/awesome‑bug.md
The template is just a markdown file:
# 🐞 Bug Report

<!--
Thank you for taking the time to report a bug!
Please fill out the sections below as completely as possible.
If something doesn’t apply, feel free to delete the line or write “N/A”.
-->

## 📄 Summary
*A short, one‑sentence description of the problem.*

> **Example:** The application crashes when opening a project that contains more than 10 000 files.

---

## 🔧 Environment
| Item               | Details |
|--------------------|---------|
| **OS**             | e.g. Windows 11 / macOS 14.2 / Ubuntu 22.04 |
| **Browser** *(if web)* | Chrome 124.0 / Firefox 127.0 / … |
| **App version**    | e.g. `v2.3.1` (commit `a1b2c3d`) |
| **Hardware** *(optional)* | e.g. 16 GB RAM, Intel i7‑12700K |
| **Other relevant configuration** | e.g. Docker, Kubernetes, custom plugins, etc. |

---

## 🪜 Steps to Reproduce
1. *First step* – what you did before the bug appears.
2. *Second step* – be as specific as possible (include URLs, commands, settings).
3. *Third step* …
4. *Observe the issue* – what you see at this point.

> **Tip:** If the bug is intermittent, note the frequency (e.g., “fails ~30 % of the time”).

---

## 📈 Expected Result
*Describe what should have happened.*

> **Example:** The project loads without crashing and the file tree is displayed.

---

## ❗ Actual Result
*Describe what actually happened (error messages, UI glitches, etc.).*
Now you can open the file in your favorite editor, fill in the sections, and later copy‑paste the final markdown into the GitHub UI or CLI.
5. Opening an Issue via the Web UI – Full Walk‑through
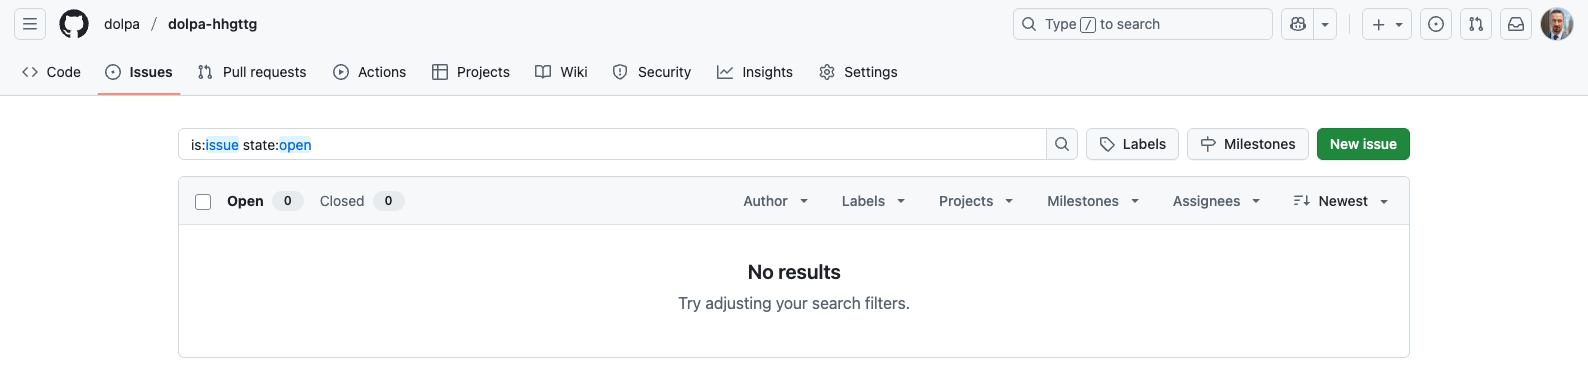
5.1 Step 1 – Navigate to the Issues tab
- Open the repository in your browser:
https://github.com/<owner>/<repo> - Click the Issues tab located in the top navigation bar (right under the repo description). See screenshot above.
5.2 Step 2 – Click New issue
- If the repo has templates, you’ll land on the Choose a template screen (see § 4).
- If there are no templates, you’ll be taken directly to the New issue editor. See screenshot above.
5.3 Step 3 – Choose the appropriate template (if any)
- Click the tile that best matches the nature of your report (e.g., Bug report).
- Some repos may have a “Custom template” that contains a form; click that to open the form.
5.4 Step 4 – Fill in the Title field
- Keep it short (≤ 80 characters) but descriptive.
- Use a verb‑noun pattern: “Crash when opening a .zip file on macOS 12”.
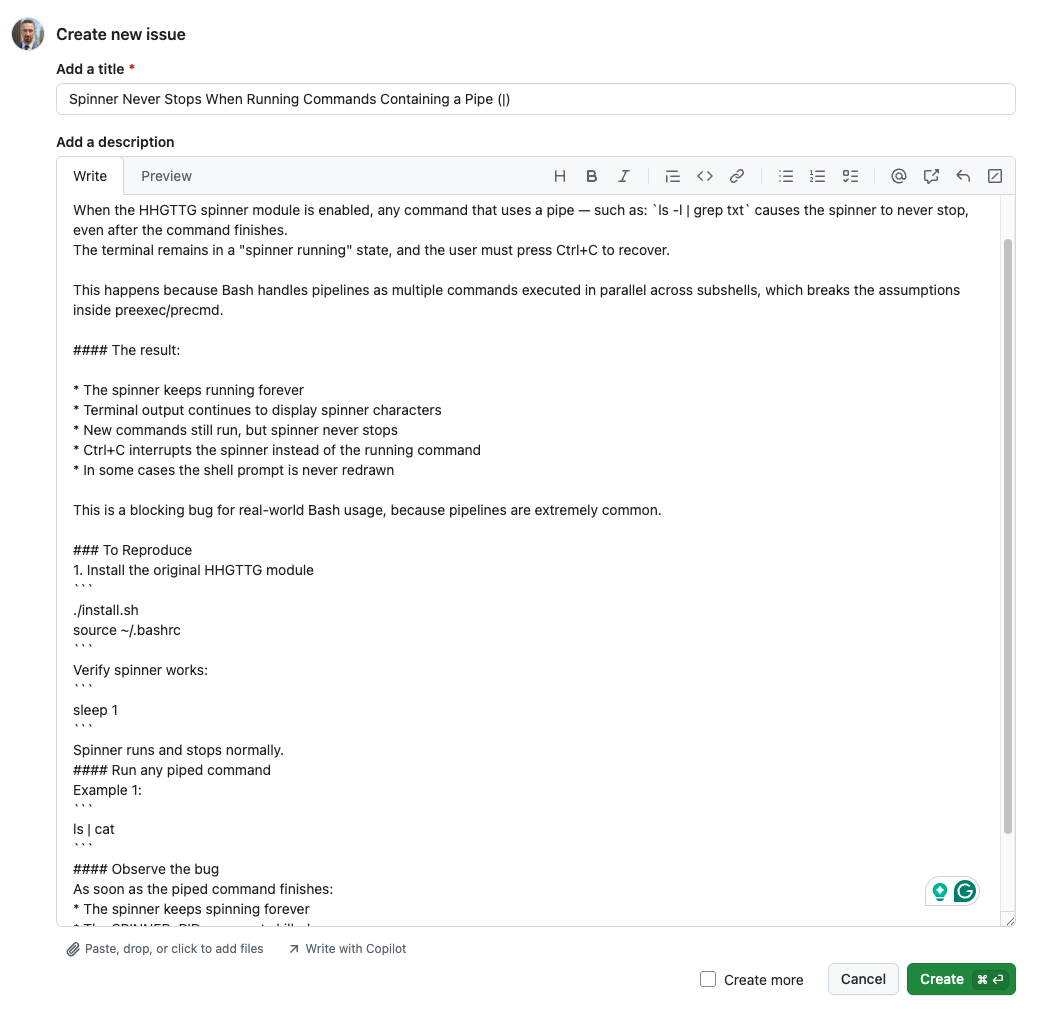
5.5 Step 5 – Write the Issue Body
You’ll see a large markdown editor. Most repos pre‑populate the body with placeholder text (e.g., <!-- TODO: fill out -->). Delete the placeholders and replace them with your own content (see § 6 for a full template).
Placeholder for screenshot
[Screenshot 9: Issue editor with the markdown toolbar visible]
5.6 Step 6 – (Optional) Attach Screenshots / Images
- Drag‑and‑drop the image file onto the editor or click the “Attach files by selecting them” link.
GitHub will upload the image to https://github.com/user/repo/assets/... and insert a markdown image tag automatically:

5.7 Step 7 – (Optional) Add Assignees, Labels, Milestones
- Assignees – Click the Assignees dropdown and select a user (you must have write access or be a collaborator).
- Labels – Click Labels and choose from existing tags (e.g.,
bug,enhancement,question). - Milestone – If the repo uses milestones (e.g., “v2.0”), you can attach the issue to one.
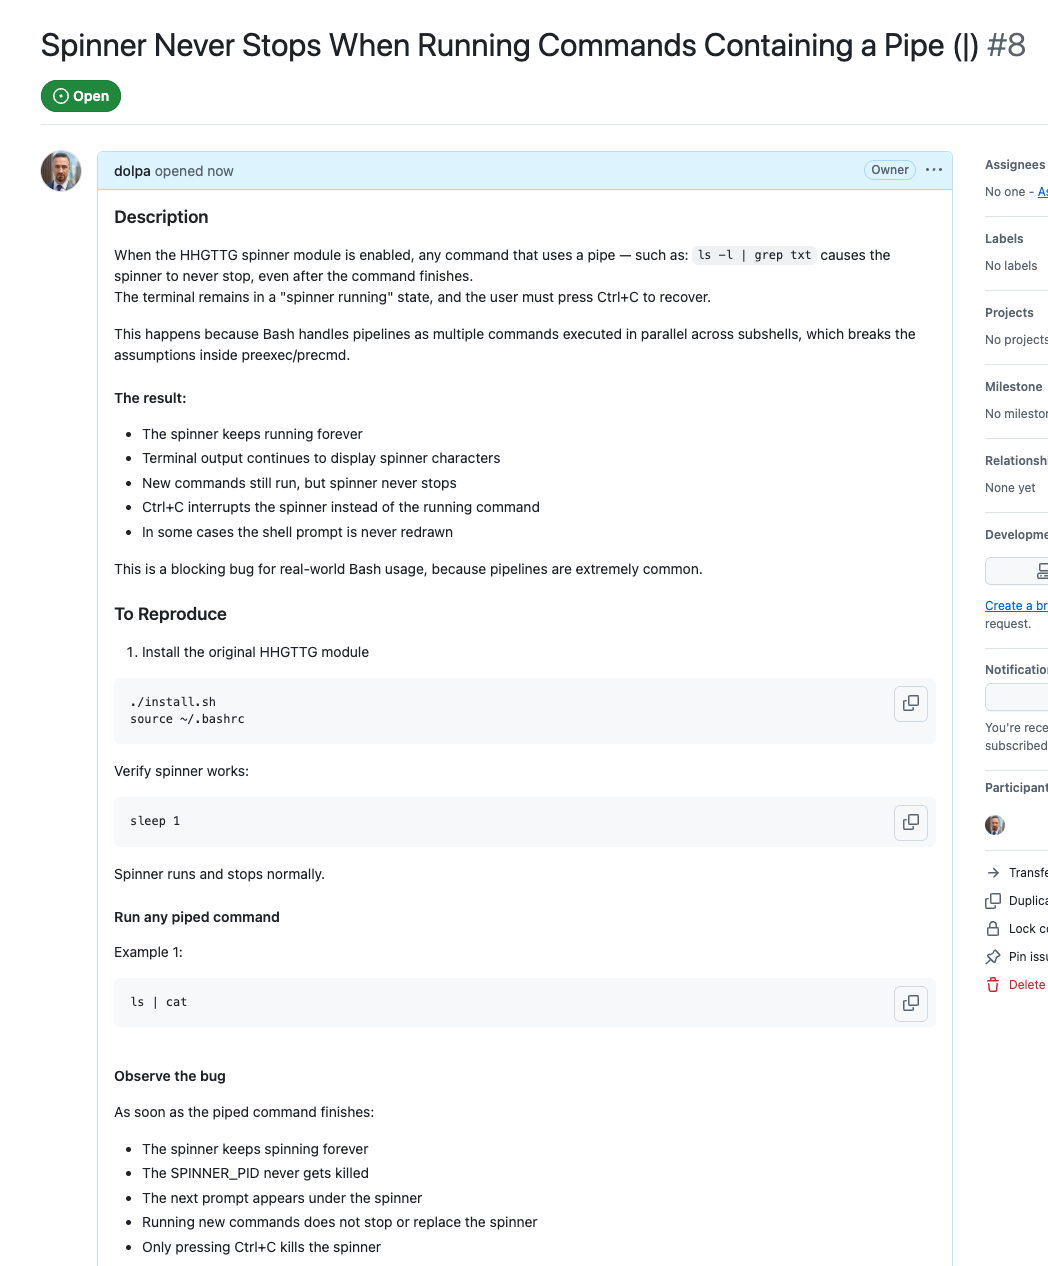
5.8 Step 8 – Submit
- Click the Submit new issue button (bottom‑right).
- You’ll be redirected to the newly created issue page, where you can see a permalink (
#<number>).
6. Writing a Great Issue Body
A well‑structured issue saves time for maintainers and speeds up resolution. Below is a canonical Markdown skeleton that works for almost any project. Feel free to copy‑paste, then replace the placeholders with your actual data.
---
title: "Short, descriptive title (max 80 chars)"
labels: ["bug"]               # <-- optional, only if you have permission
assignees: ["@username"]      # <-- optional, only if you have permission
milestone: "v2.5"             # <-- optional, only if a milestone exists
---

## 📋 Summary

_A one‑sentence summary of the problem or request._

## 🐛 Expected Behavior

_What you expected to happen._

## 🔧 Actual Behavior

_What actually happened (including error messages, UI glitches, etc.)._

## 📦 Environment

| Item | Value |
|------|-------|
| **OS** | macOS 14.6 / Windows 11 / Ubuntu 22.04 |
| **Browser** | Chrome 124.0.0.0 |
| **App version** | `v2.45.0` |
| **GitHub CLI** | `gh version 2.45.0` |
| **Node / Python / etc.** | `node v20.12.0` |
| **Other relevant tools** | Docker 24.0, VS Code 1.88 |

## 🛠️ Steps to Reproduce

1. _Step 1 – describe the first action (e.g., “Open the Settings page”)._
2. _Step 2 – …_
3. _Step 3 – …_

**Result:** _What you see (error, crash, UI bug, etc.)._

## 📂 Relevant Files / Code

```diff
# Example diff that shows the problematic code (optional)
- oldLine = somethingWrong()
+ newLine = somethingFixed()
# Minimal reproducible snippet (replace with actual language)
def buggy_function(arg):
    # …
    return result
Why this layout works
| Section | Reason |
|---|---|
| Summary | Gives a quick glance for triagers. |
| Expected vs. Actual | Makes the bug concrete. |
| Environment table | Allows maintainers to quickly see platform‑specific details. |
| Steps to Reproduce | Enables a reproducer to verify the problem. |
| Code snippets | Shows the exact line that fails (use triple back‑ticks with language identifier). |
| Screenshots | Visual clues for UI bugs. |
| Related links | Connects the new issue to existing work. |
| Additional context | Anything that doesn’t fit elsewhere but may be useful. |
7. Opening an Issue with the GitHub CLI (gh)
If you prefer the terminal, the CLI gives you a fast, reproducible workflow that can even be scripted.
7.1 Install the CLI (if you haven’t already)
# macOS
brew install gh

# Ubuntu/Debian
sudo apt install gh

# Fedora
sudo dnf install gh

# Verify
gh --version
For more information about installing GH CLI, please see this guide.
7.2 Authenticate (once)
gh auth login
Follow the interactive prompts (browser or device code flow).
7.3 List available issue templates
gh issue list --repo <owner>/<repo> --limit 5
If the repo ships templates, you’ll see them under “Templates” when you run:
gh issue create --repo <owner>/<repo> --web
7.4 Create a new issue (interactive)
gh issue create \
  --repo <owner>/<repo> \
  --title "Short, descriptive title" \
  --label "bug" \
  --assignee "@myself" \
  --milestone "v2.5"
The CLI will open your default editor (respecting $EDITOR or $VISUAL). Paste the markdown body from the template in § 6, edit the placeholders, then save & close. The issue is created automatically.
7.5 Create a new issue (non‑interactive, all in one line)
gh issue create \
--repo cli/cli \
--title "Crash when opening a .zip file on macOS 14.6" \
--body "$(cat <<'EOF'
## Summary
Opening a .zip file in the extension crashes VS Code.
## Expected behavior
The file should open normally.
## Actual behavior
VS Code throws:
## Steps to reproduce
1. Open VS Code 1.88.
2. Press **File → Open…** and select a `.zip` archive.
3. Observe the crash.
## Environment
- OS: macOS 14.6
- VS Code: 1.88.0
- Extension: `zip‑viewer@0.3.2`
## Screenshots

## Related
Closes #987
EOF
)" \
--label "bug" \
--assignee "@myself"Tip: Store the large body in a separate.mdfile (e.g.,bug-report.md) and reference it with--body-file bug-report.md.
7.6 Adding labels, milestones, assignees via CLI
# Add a label
gh issue edit 123 --add-label "bug"

# Set a milestone
gh issue edit 123 --milestone "v2.5"

# Assign the issue
gh issue edit 123 --add-assignee "@maintainer"
8. Best‑Practice Checklist Before You Click Submit
| ✅ | Check |
|---|---|
| 1 | Is the issue already reported? Search with relevant keywords. |
| 2 | Does the repo have a template? Use it. |
| 3 | Title ≤ 80 chars, starts with a verb (e.g., “Crash”, “Add”, “Document”). |
| 4 | Provide environment details (OS, version, dependencies). |
| 5 | Include steps to reproduce that anyone can follow. |
| 6 | Attach minimal code snippet that reproduces the bug (preferably < 30 lines). |
| 7 | Add screenshots for UI‑related problems. |
| 8 | Mention any related issues / PRs (Closes #X, Related #Y). |
| 9 | Use labels only if you have permission; otherwise, let maintainers add them. |
| 10 | Double‑check the title for typos and clarity. |
| 11 | If the problem is a security vulnerability, use the Security tab, not a public issue. |
| 12 | If you’re asking a how‑to question, verify the project’s policy (some prefer Discussions). |
9. Common Pitfalls & Troubleshooting
| Problem | Likely cause | Fix |
|---|---|---|
| “I can’t create an issue” (button disabled) | Repository has Issues disabled (owner turned them off). | Use the Discussions tab or contact the repo owner. |
| Issue closed immediately | Repo has a bot (e.g., probot‑close‑stale) that auto‑closes issues without the required template fields. | Fill all required sections or follow the template exactly. |
| Missing label / assignee dropdown | You lack write/triage permissions. | Ask a maintainer to add you as a collaborator or request the label via a comment. |
| Large log file (> 10 MB) | GitHub UI limits file size to 25 MB per image, 10 MB per file upload. | Upload the log to a Gist or a pastebin service and link to it. |
| “Security” issue should not be public | You posted a potential vulnerability. | Use Settings → Security → Report a vulnerability or email the security address listed in the repo’s SECURITY.md. |
| CLI shows “no such issue” after creating | You used a draft issue (--draft) which isn’t visible to non‑collaborators. |
Remove --draft or ask a collaborator to convert it. |
| “Duplicate of #XYZ” | Maintainers think you reported an existing issue. | Edit your issue to reference the original or add a comment linking both. |
10. After You Submit
- Watch the issue – Click Subscribe on the right sidebar to receive notifications for every comment.
- Respond promptly – If a maintainer asks for more info, edit the issue body or comment with the requested data.
- Edit – Click the Edit button (pencil icon) to modify the title or body.
- Close yourself (if you’re the reporter and the issue is resolved via external means) – Click Close issue.
- Reference – When a pull request fixes the issue, the maintainer will usually write “Closes #123” in the PR description. Once merged, the issue automatically transitions to Closed.
11. Checklist & Cheat‑Sheet (Markdown friendly)
# Issue‑creation checklist

- [ ] Search for existing issues (use `is:open` + keywords)
- [ ] Pick the right template (Bug / Feature / Docs)
- [ ] Write a concise title (≤ 80 chars)
- [ ] Fill the markdown body:
  - Summary
  - Expected behavior
  - Actual behavior
  - Environment table
  - Steps to reproduce
  - Code snippet (if applicable)
  - Screenshots / GIFs
  - Related issues / PRs
- [ ] Add appropriate labels (if you have permission)
- [ ] Assign a maintainer (if you have permission)
- [ ] Choose a milestone (if applicable)
- [ ] Submit

# CLI one‑liner example

gh issue create \
  --repo <owner>/<repo> \
  --title "Add dark‑mode toggle to UI" \
  --body-file ./templates/feature-request.md \
  --label "enhancement" \
  --milestone "v3.0"
12. Glossary
| Term | Definition |
|---|---|
| Assignee | A GitHub user who is explicitly responsible for handling the issue. |
| Label | A tag that categorises an issue (e.g., bug, question). |
| Milestone | A collection of issues/PRs that share a target (usually a release). |
| Triager | A maintainer who sorts incoming issues into categories and assigns them. |
| Issue Form (YAML) | A structured, interactive form defined in .github/ISSUE_TEMPLATE/*.yml that prompts for specific fields. |
gh |
The official GitHub command‑line client. |
--web flag |
Opens the default browser to the web UI for interactive editing. |
--body-file |
Reads the issue body from a local markdown file instead of inline text. |
Closes #123 |
A special keyword that automatically closes the referenced issue when the PR merges. |
13. Final Thoughts
- Be respectful – Remember that many open‑source maintainers are volunteers.
- Provide reproducibility – The easier it is for them to see the bug, the faster they can fix it.
- Use the right channel – Bugs → Issues; questions → Discussions (if the project prefers).
Bonus: Automating Issue Creation via a GitHub Action
If you have a process that automatically creates an issue when a test suite fails, you can use a tiny action:
name: Auto‑create issue on test failure
on:
  workflow_run:
    workflows: ["CI"]
    types:
      - completed
jobs:
  create-issue:
    if: ${{ failure() }}
    runs-on: ubuntu-latest
    steps:
      - uses: actions/github-script@v6
        with:
          script: |
            const title = "Automated: Test suite failure on ${{ github.ref_name }}";
            const body = `## Summary\nAutomated test failure.\n\n**Log:**\n\`\`\`\n${process.env.TEST_LOG}\n\`\`\``;
            await github.rest.issues.create({
              owner: context.repo.owner,
              repo: context.repo.repo,
              title,
              body,
              labels: ['bug', 'automated']
            });