

Intro
After spending several weeks experimenting with different mods for Cyberpunk 2077, I gradually narrowed everything down to a small set of modifications that I genuinely enjoyed and wanted to keep.
To make sure this effort wouldn’t go to waste, I decided to create my own mod collection on Nexus Mods—not necessarily to publish it, but to organize and preserve a setup I could reliably return to.
That’s when I ran into an unexpected limitation: collections can only be created through the application itself, not via the website.
Although there is a Linux-compatible version of Vortex, I became curious about something else. Instead of using the native or ported solution, I wanted to see how well the original Windows version would behave under Wine.
More specifically, I decided to try installing it using Bottles, a more controlled and isolated way to manage Windows applications on Linux.
How to install Vortex (the Riot‑Games mod manager) inside Bottles on Ubuntu 22.04/23.10, and how to give it a custom icon + banner in the Bottles → Library view
Scope – This guide assumes you are running the default GNOME desktop, have a working internet connection, and want to keep everything inside your user account (no root‑only hacks). It works whether Bottles was installed from Flatpak, Snap, or the deb package.
No external scripts are required, except for the optional one‑liner at the end (purely for automation).
1. Install Bottles (if you don’t already have it)
| Method | Command | Notes |
|---|---|---|
| Flatpak (recommended for the freshest version) | flatpak install |
Gives you automatic updates via flatpak update. |
| Snap | sudo snap |
Snap sandbox is a bit tighter; you’ll need the same filesystem override as shown later. |
| Deb (Ubuntu repo – usually a few releases behind) | sudo apt update && |
Simpler, but you may miss the newest UI features. |
Flatpak filesystem permission (only once) – If you installed the Flatpak version, give it permission to write into your home applications folder (where the Library shortcuts live):flatpak override --user --filesystem=home com.usebottles.bottles
After installation, launch Bottles once so it creates the ~/.local/share/bottles and ~/.local/share/applications directories.
2. Create a new Bottle for Vortex
- Open Bottles (
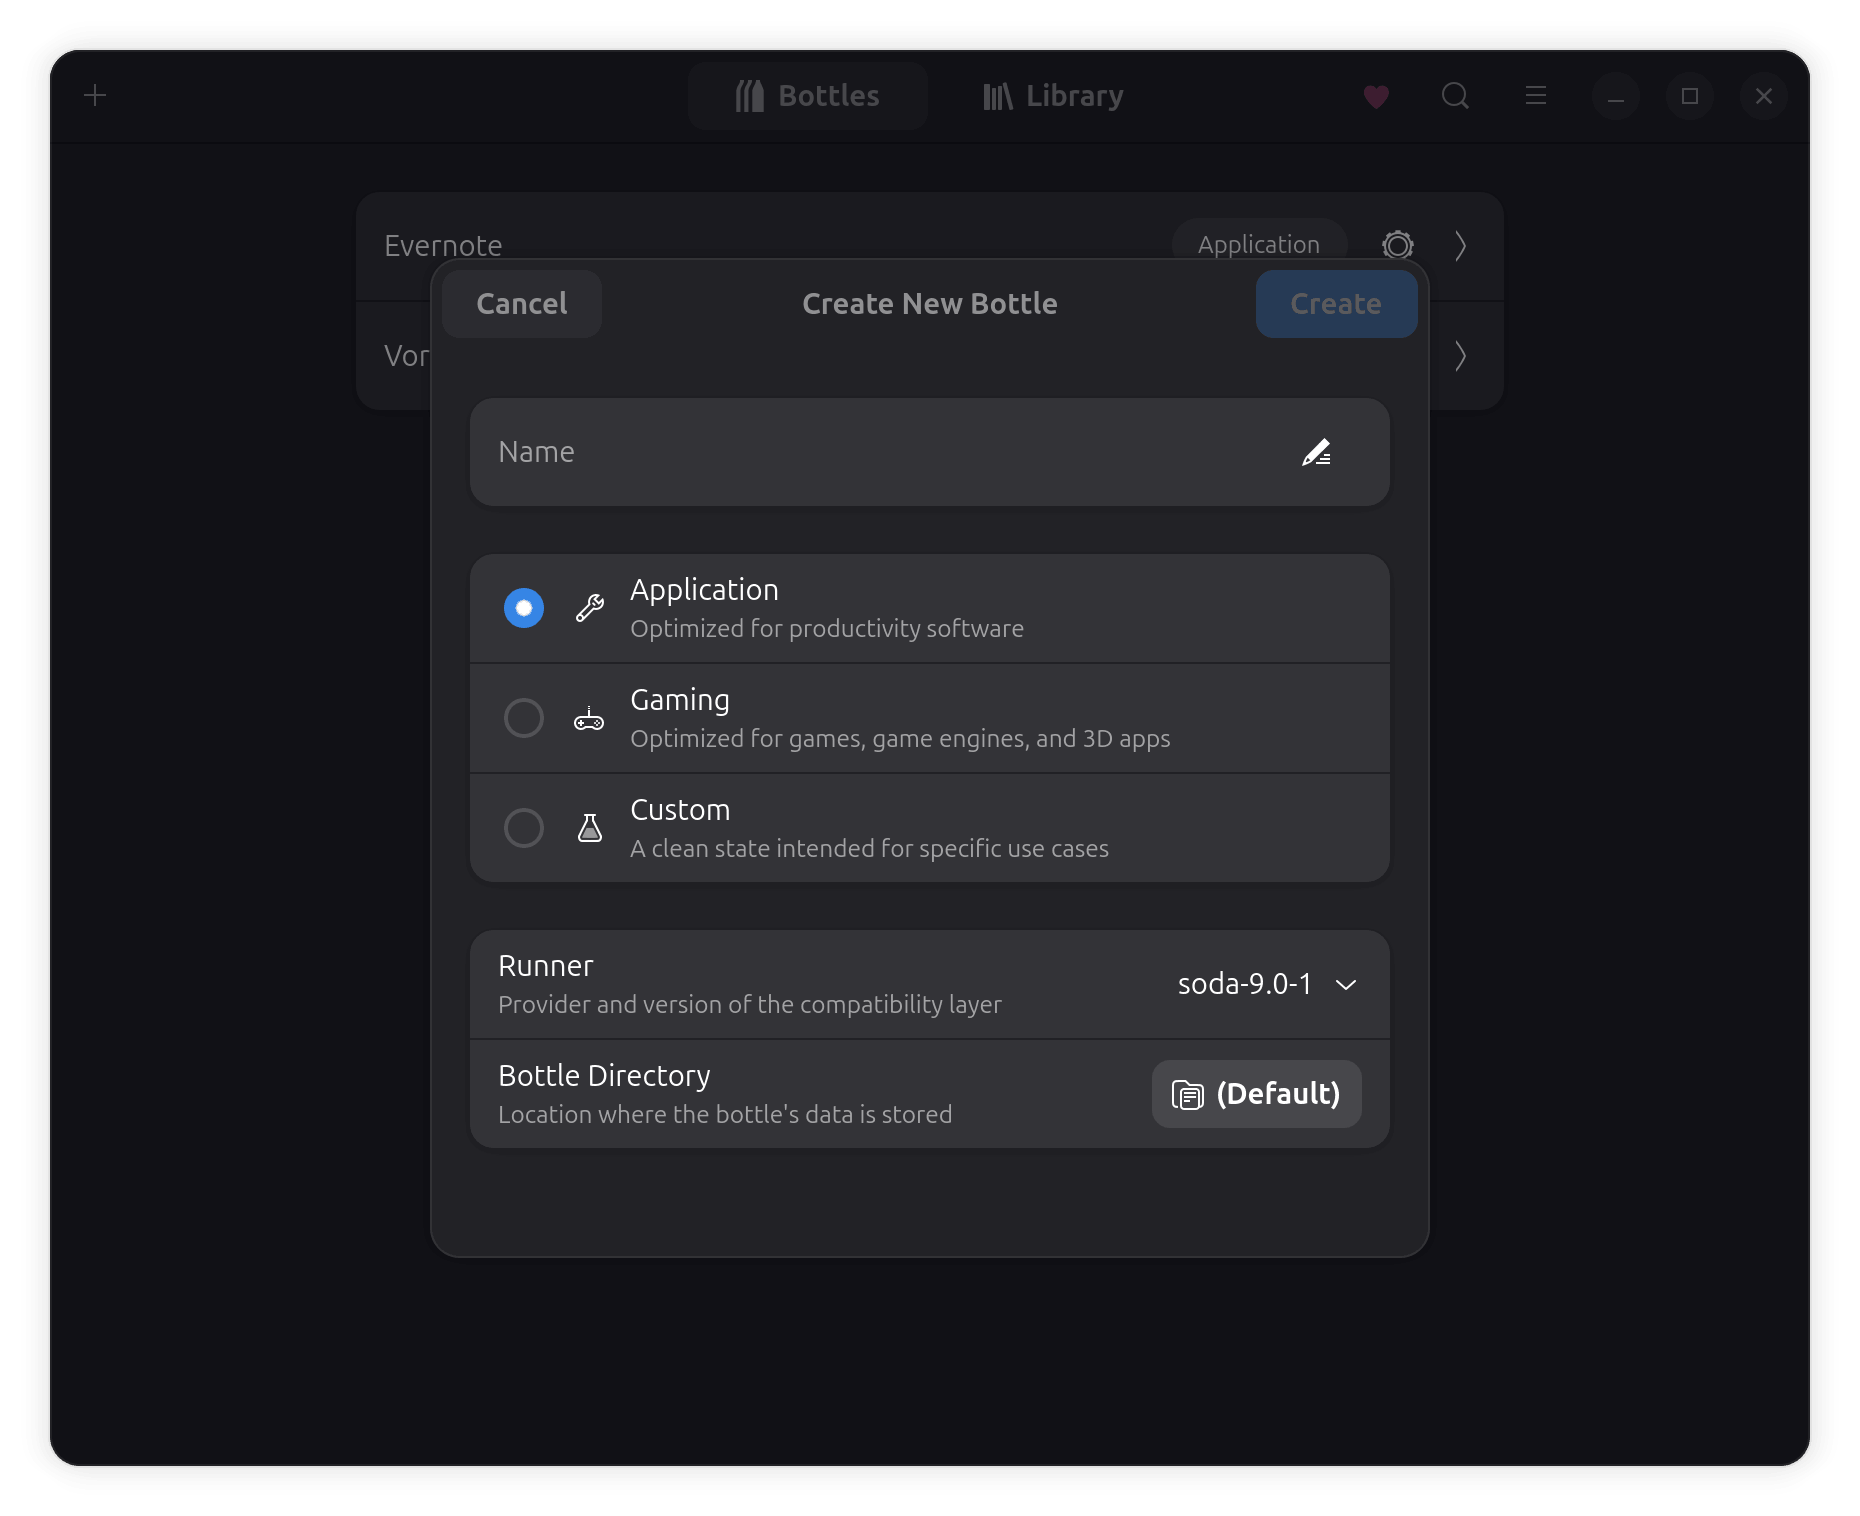
Super→ type Bottles → Enter). - Click + New Bottle → Standard (or Gaming if you prefer the pre‑configured settings).
- Name it something recognisable, e.g. Vortex.
- Choose a Windows version – Vortex runs fine on Windows 10; Bottles sets this automatically for the Standard template.
- Click Create. Bottles will spin up a fresh Wine prefix (≈ 200 MB) and open the bottle’s management page.
Why a dedicated bottle?
Vortex installs its own runtime (Electron + . NET), and keeping it isolated avoids polluting other games / tools.
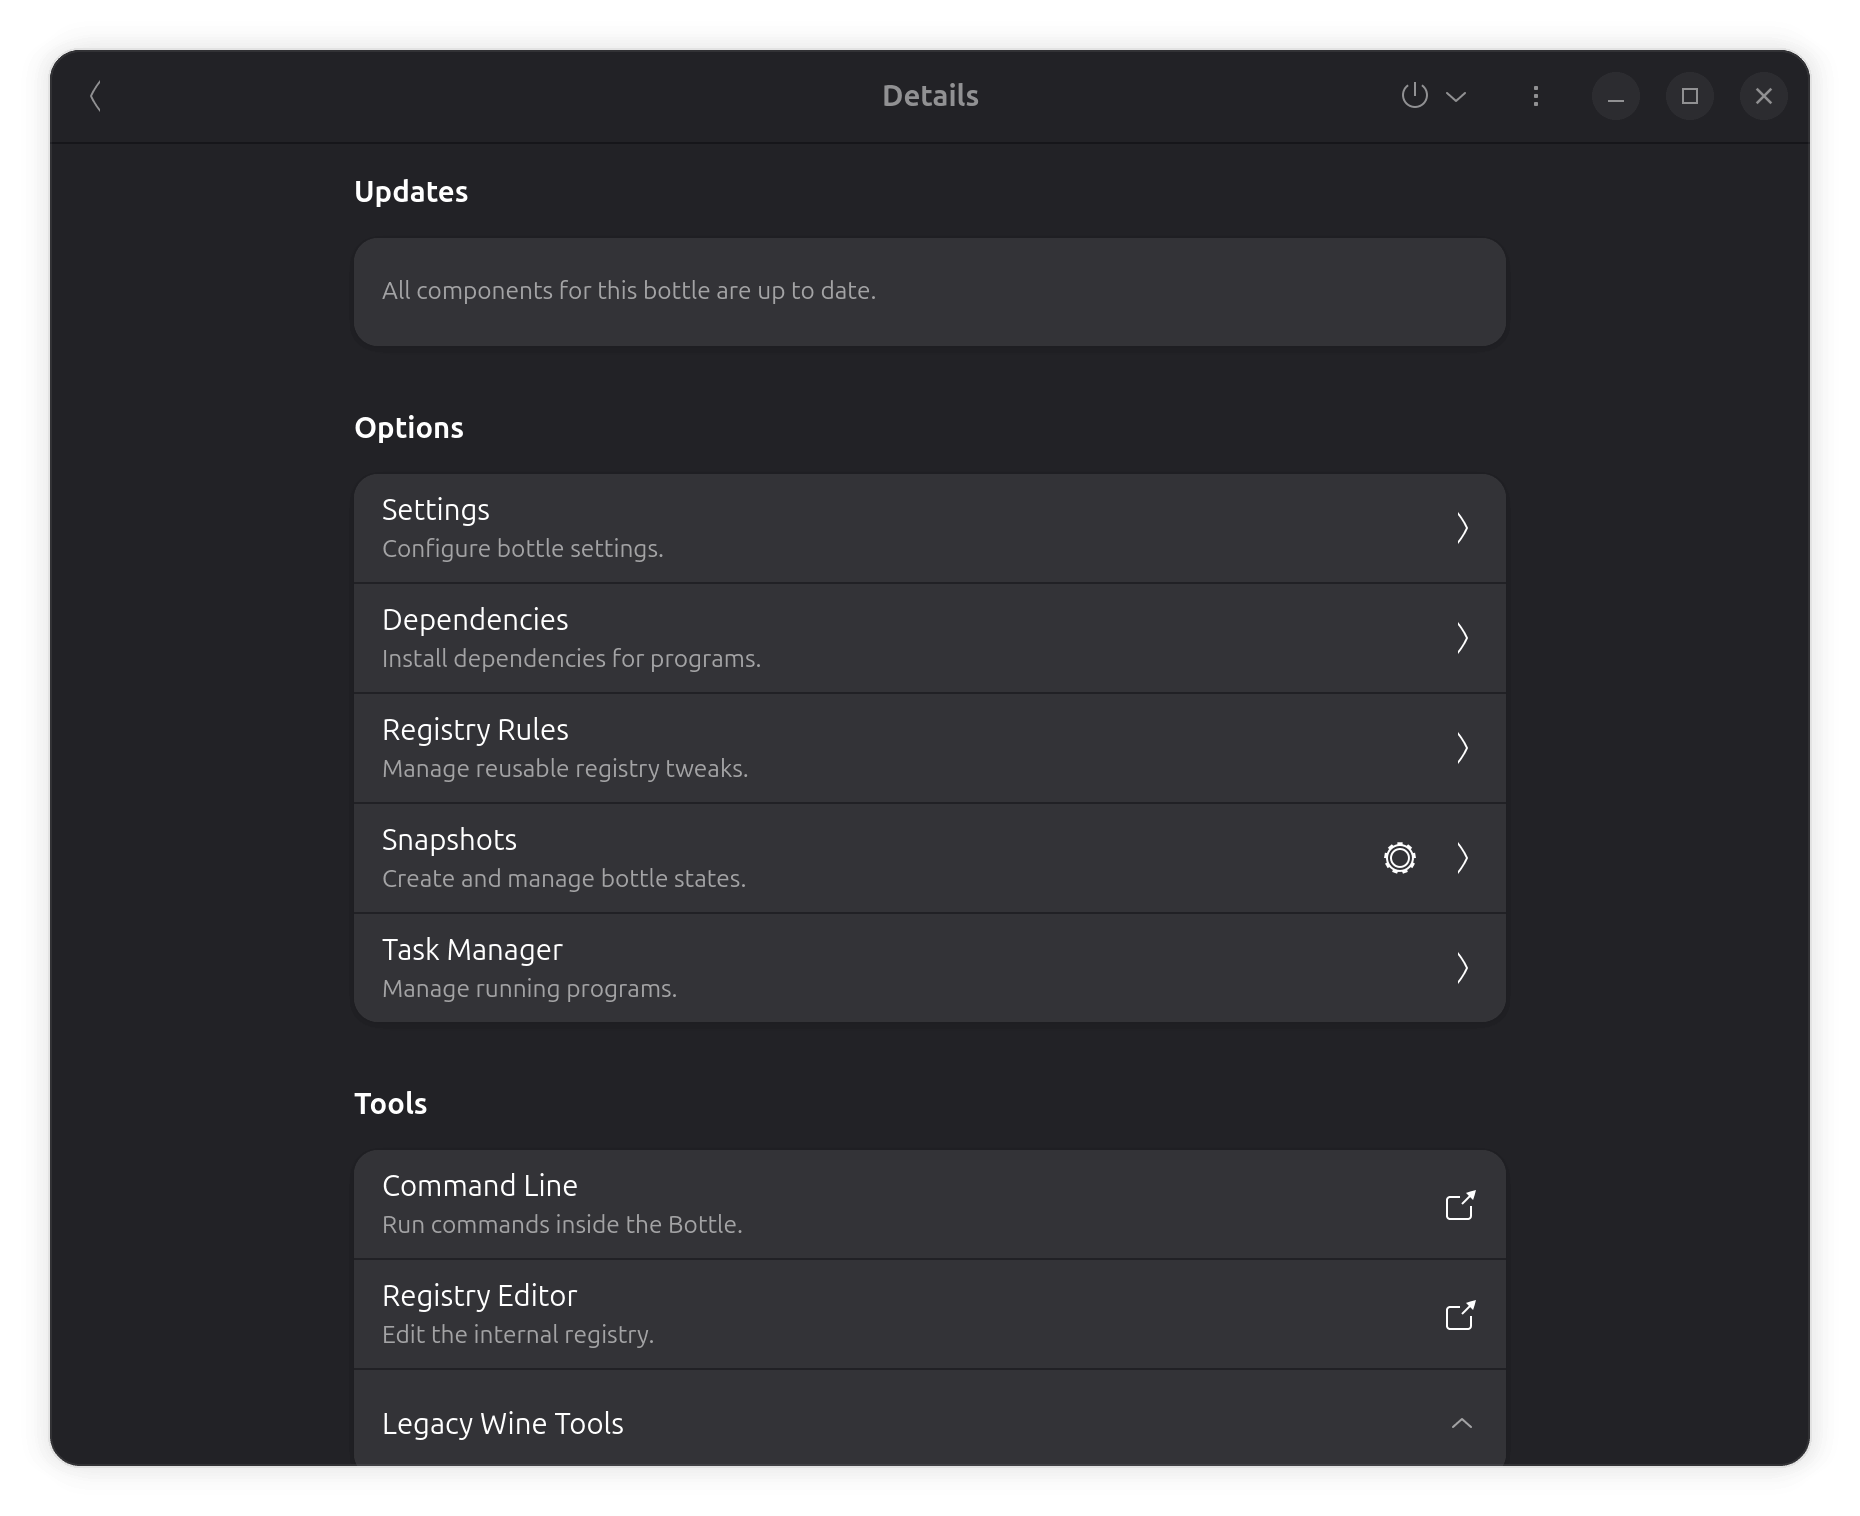
3. Install Windows dependencies inside the bottle
Vortex needs a few Windows components that are not part of the default Wine build:
| Dependency | Reason | Installation command (run inside the bottle) |
|---|---|---|
vcrun2015 (Visual C++ 2015 Redistributable) |
Required for many Electron apps. | winetricks vcrun2015 |
dotnet48 (optional – some plugins use .NET) |
Gives extra compatibility for future mods. | winetricks dotnet48 |
corefonts (Microsoft core fonts) |
Improves UI rendering inside Vortex. | winetricks corefonts |
How to run the commands:
- In Bottles, select the Vortex bottle → click the Terminal (⚡) icon.
- The terminal opens already set to the bottle’s environment. Paste each
winetricksline and press Enter. - Accept any prompts (
Yfor “yes”).
Tip – If winetricks is missing, install it on the host first:sudo apt install winetricks # works for both flatpak & deb installations
Or just from the Bottles, install dependencies:
4. Download & run the Vortex installer
- Get the latest Windows installer from the official site:
mkdir -p ~/Downloads/vortex && cd ~/Downloads/vortex
wget -O VortexSetup.exe https://nexusmodsapp.nexusmods.com/Vortex-1-1-16-6-1772448630.exe
(The URL may change; grab the latest .exe from the Nexus Mods “Vortex” page.)
- Run the installer inside the bottleOR, from the bottle’s terminal (still in
~/Downloads/vortex):- In the Bottles UI, with the Vortex bottle selected, click the Run executable (▶) button.
- In the file chooser, navigate to
~/Downloads/vortex/VortexSetup.exeand press Open.

wine VortexSetup.exe
- Installation wizard
- Accept the license, choose the default install path (
C:\Program Files\Vortex). - Let the installer finish (it will copy ~ 200 MB of Electron files).
- Accept the license, choose the default install path (
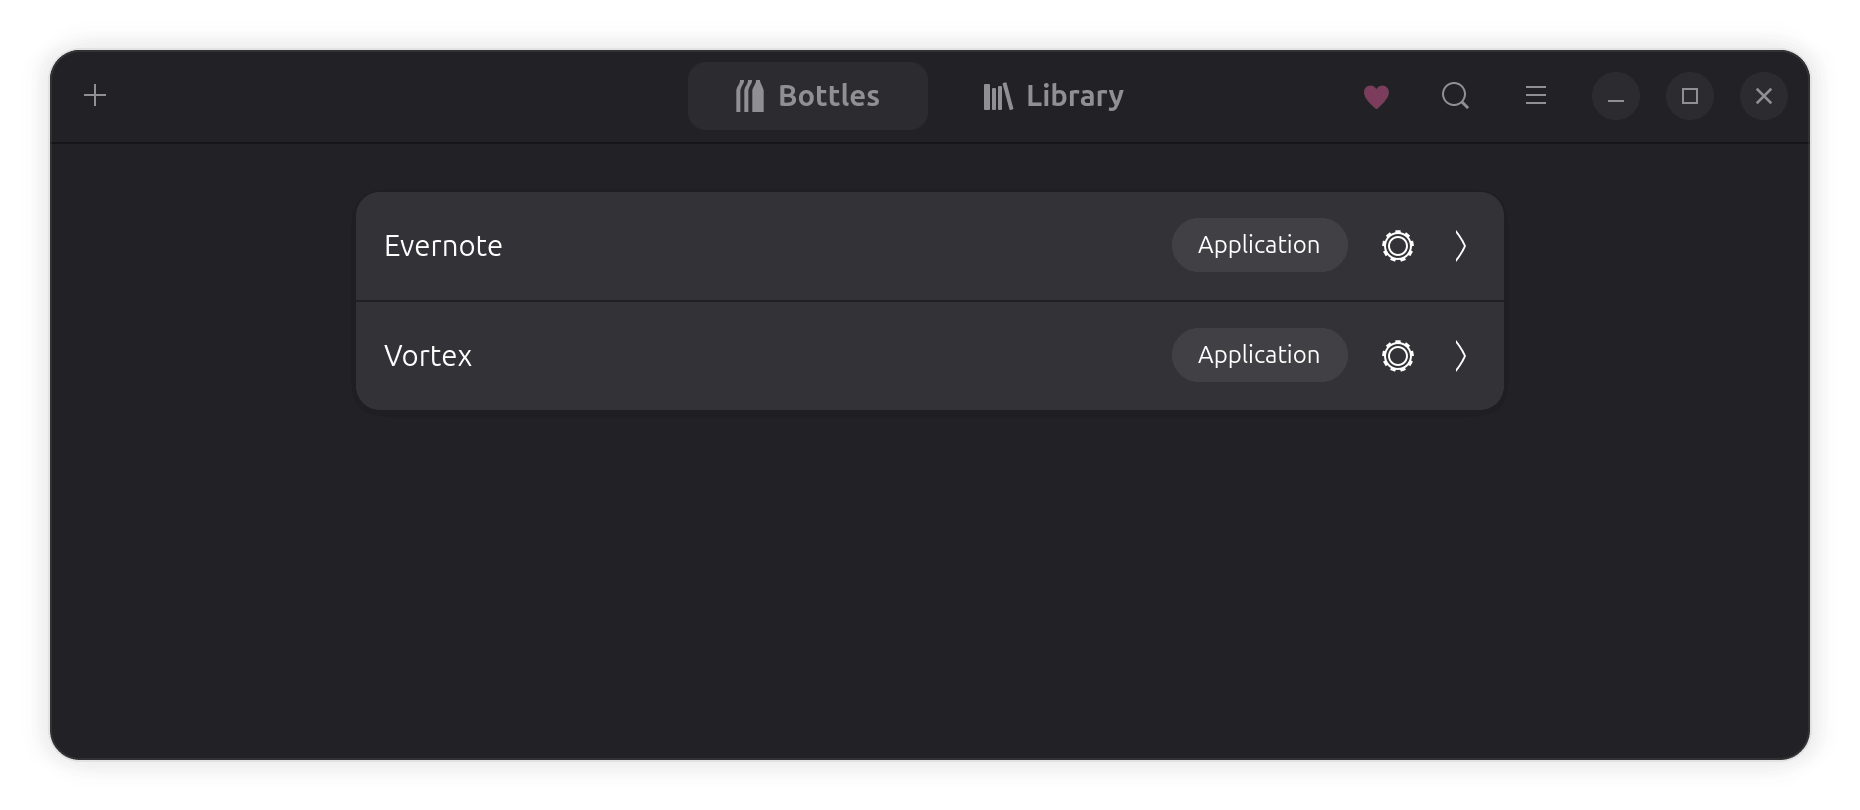
- Finish & close the installer. Bottles will automatically add an entry called Vortex to the Library tab (see next section).
5. Verify Vortex works inside Bottles
- In the Vortex bottle page, click the Run (▶) button next to the newly created Vortex entry, or press the Terminal button and type:
wine "C:\\Program Files\\Vortex\\Vortex.exe"
- Vortex should launch (Electron window with the Nexus Mods logo).
- Log in with your Nexus Mods account and verify that the Mods tab populates.
If you see a crash or “missing DLL”, repeat Step 3 and make sure vcrun2015 is installed.
6. Customise the Library entry – Icon & Banner
Now that Vortex is installed, we will give it a personalised icon and a wide banner that appear in Bottles → Library.
All customisation is stored in a user‑level.desktopfile located in~/.local/share/applications. You can edit it through Bottles’ UI or directly with a text editor – both methods are described.
6.1 Prepare the graphics you want to use
| File | Recommended size | Format |
|---|---|---|
| Icon | 256 × 256 px (any square) | PNG / JPG (no SVG) |
| Banner | 1920 × 1080 px (or any 16:9) – ≤ 5 MiB | PNG / JPG / WebP |
Place them where you can reference them with an absolute path:
mkdir -p "$HOME/Pictures/icons" "$HOME/Pictures/banners"
# Example – copy your prepared files there:
cp path/to/your‑icon.png   "$HOME/Pictures/icons/vortex-icon.png"
cp path/to/your‑banner.jpg "$HOME/Pictures/banners/vortex-banner.jpg"
6.2 Add the Vortex entry to the Library (if it isn’t already)
When you created the bottle, Bottles should have automatically generated a .desktop file for Vortex.
If you don’t see Vortex under Bottles → Library:
- Select the Vortex bottle, scroll down to Vortex as the executabl → click the ⋮ (three‑dot) menu → Add Desktop Entry.
- Click Create – a file named something like
Vortex (bottles).desktopnow lives in~/.local/share/applications.
Flatpak/Snap note – The shortcut is a regular .desktop file; the host’s desktop environment can read it without any special permissions.6.3 Edit the .desktop file – either via Bottles UI or manually
6.3.1 Using the Bottles UI (quickest for most users)
- Open Bottles → select the Vortex bottle → click the ⋮ menu → Add to Library (if it isn’t already there).
- In the Library tab, locate the Vortex entry, hover → click the gear (⚙️) icon → Edit.
- In the small editor that pops up, you can paste the absolute paths for the icon and banner (see below).
6.3.2 Editing the file directly (full control)
- Find the .desktop file
DESKTOP=$(ls ~/.local/share/applications/*vortex*.desktop | head -n1)
echo "Using .desktop file: $DESKTOP"
- Insert / replace the icon line
ICON="$HOME/Pictures/icons/vortex-icon.png"
sed -i -E "s|^Icon=.*|Icon=$ICON|" "$DESKTOP"
- Add the banner line (
X‑Bottles‑Coveris the key Bottles reads for the Library background)
BANNER="$HOME/Pictures/banners/vortex-banner.jpg"
# If the key already exists, replace it; otherwise append it.
if grep -q '^X-Bottles-Cover=' "$DESKTOP"; then
    sed -i -E "s|^X-Bottles-Cover=.*|X-Bottles-Cover=$BANNER|" "$DESKTOP"
else
    echo "X-Bottles-Cover=$BANNER" >> "$DESKTOP"
fi
- Refresh the desktop database (makes GNOME recognise the new icon instantly)
update-desktop-database ~/.local/share/applications
- Force Bottles to reload its thumbnail cache (clears the old placeholder)
rm -f ~/.cache/bottles/*.thumb # safe – only Bottles‑generated thumbnails
- Restart Bottles (close the window and open it again) – the Vortex card now shows your custom banner and the new icon.
[Desktop Entry]
Name=Vortex Mod Manager
Exec=flatpak run --command=bottles-cli com.usebottles.bottles run -b "Vortex" -p "Vortex"
Type=Application
Terminal=false
Icon=/home/pavel/.local/share/icons/vortex-app-icon.png
Categories=Game;
6. Troubleshooting cheat‑sheet
| Symptom | Likely cause | Fix |
|---|---|---|
Vortex fails to launch (missing vcruntime140.dll etc.) |
Missing vcrun2015 |
Re‑run winetricks vcrun2015 inside the bottle. |
| Icon doesn’t change | .desktop file still points to old icon or uses relative path |
Use an absolute path (/home/…/vortex-icon.png) and run update-desktop-database. |
| Banner stays default | X‑Bottles‑Cover line missing or image too large |
Add the line manually and ensure banner ≤ 5 MiB. |
| Bottles entry disappears after reboot | .desktop file deleted or overwritten by an export |
Re‑create shortcut via Bottles → Export → Create shortcut and then re‑apply customisation. |
| Flatpak permission error | Trying to edit a file outside your home dir | Keep graphics inside $HOME (allowed) or adjust Flatpak permissions (flatpak override …). |